How to better recover from CrashPlan when you receive a Unable to Connect to the Backup Engine.
What is CrashPlan – CrashPlan is data protection software for endpoint devices. CrashPlan runs continually in the background of a device, providing constant backup of new files. Any time a new file is created or an existing file is changed, the product adds the file to a “to do” list. These files are then backed up during the next scheduled backup period. Backup frequency can be custom set by the user. – Definition by TechTarget
 Do you experience this happening when you try to recover from CrashPlan: Restore Running => Backup Disabled – not available => ∞
For over the past 6 months or so I have been attempting to recover an external hard drive that died BUT have backed up with CrashPlan. As you can imagine this process can be painstakingly daunting task especially when the recover of the data exceeds 1 TB+ of data. So your probably asking, well why would you backup 1 TB+ of data to the cloud knowing darn well that it could take X amount of time to pull all that data down? Well the honest answer is because the data in the cloud was my fail over (last stand) recovery plan. I have my existing external hard drive > a backup of that external drive > then a final backup in the cloud with CrashPlan.
Well I will stop beating around the bush and side step my backup strategy here and provide you information and commands on how I was able to get my data back. As many of you know I love bullet points so I will again bullet point this for you as I feel this is the best way for you to follow my lead.
- If you ever see a message in CrashPlan that says restore pending, or unable to connect to backup engine do the following. Double click on the CrashPlan Logo at the top right of the application and type into the field reconnect. Typing this in will allow your computer to attempt to try and reconnect to the backup engine.
- If this did not work and your system continues to state that unable to connect to backup engine attempt to restart your computer. I know your probably thinking that this is an easy response…and it is, however this can be at times the most simplest way to started again.
- So how did that work for you? Any luck? Still getting the unable to connect to backup engine message? Well then, this is exactly what was happening to me which left me at a lost. I had to reconnect after 10 to 15 minutes over and over again as I continue to get the dreaded CrashPlan Unable to Connect to Backup Engine.
So here is how I solved it. Well first off we need to know our system information, as not all of our systems are the the same. Start by following these instructions based on the information that you currently have:
Sending System Information To Support
https://support.code42.com/CrashPlan/4/Troubleshooting/Sending_System_Information_To_Support
So based on the information from above. I had 64 Bit OS and 16GB of RAM. I was made aware that I would want to allocate enough RAM to handle an 8TB archive. It was recommended that I would recommend update my CrashPlan memory to 8192MB (8GB of RAM).
Once you have obtained this information prepare to use it to compare your system to mind. Do you have enough RAM allocation towards your recovery? This could very well be the reason why your CrashPlan’s Backup is Disabled.
[code]Here are instructions below to allocate more memory to the CrashPlan backup engine:
1. Open the CrashPlan app
2. Double-click the CrashPlan logo in the upper-right
3. Copy and paste the following bolded text into the box: **java mx 8192, restart**
4. Press enter
CrashPlan will close to apply the change.
To confirm that the setting applied, reopen the CrashPlan application and repeat the steps above. This time type **java mx** in the command line window.[/code]
After you have allocated memory you will want to proceed with the adoption process listed directly below.
[code]1. Open the CrashPlan desktop application
2. Double-click on the little house in the top-right of the CrashPlan desktop application
3. Type in the following: guid 630513738075603206 and hit Enter/Return
4. Log back in as an existing user
5. The adoption process is now complete
After you log back in, CrashPlan will need to synchronize file and block information (this could take a several hours due to the archive size). After this completes, you will be able to Restore.
Keep in mind that it is recommend restoring the files as of a date prior to the adoption. Alternatively, you can restore all deleted files.
* https://support.code42.com/CrashPlan/4/Restoring/Downloading_Files_After_Replacing_A_Device#Step_2:_Restore_Your_Files[/code]
Now then once I was able to bump my RAM allocation for 2 GB Default to 8 GB I experienced downloads from 5 MB down from CrashPlans Backup Engine up to 20 MB’s! This was a big bump, however unfortunately I got the following message occasionally and by Random. Restore Running and this message would just sit there as illustrated below.
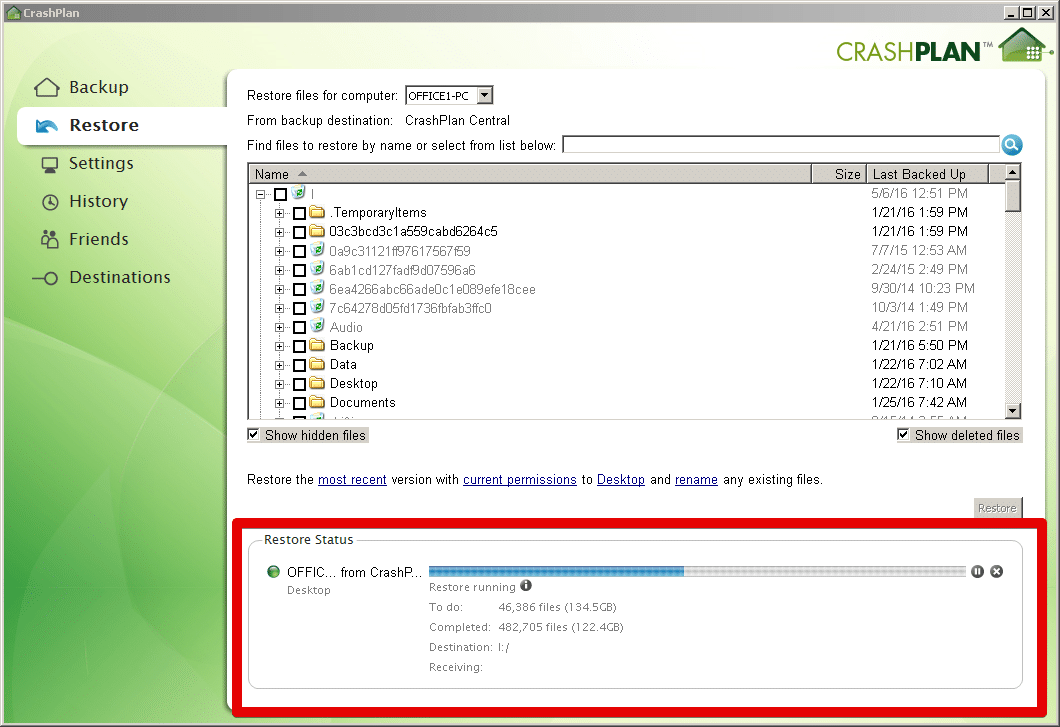
CrashPlan Restore Running
Here is what I did, I was able to address this simply by restart the CrashPlan backup engine:
[code]Do the following:
1. Open the CrashPlan app
2. Double-click the CrashPlan logo in the upper-right and type: ra, restart
3. Press Enter[/code]
Well I do hope this information helps you as much as it has helped me. Keep in mind that with all this information I made a lot of assumptions regarding you networking, file shares, and system information. If any one has information to add to this post by all means leave a comment and let me know if this information was useful or if you have any specific questions.
Leave A Comment