
If you are here it looks as though your Raspberry Pi is in Maintenance Mode. There are many reasons why this can happen, but usually it’s due to the FSTAB not booting to the boot partition. For example on my Raspberry Pi I have a 2TB external hard drive that I have mounted. View How to mount an external hard drive on linux for more information on how to do so. In this entry I will walk you though on how I was able to get my Raspberry Pi out of Maintenance Mode by using another Raspberry Pi to edit the FSTAB.
Prerequisites:
- Create a backup of your SD Card (to be safe)
- Have knowledge of the Linux system and be able to run the necessary commands
- Have an SD card reader that can connect via USB that can read a MicroSD card.
- Have an external HDMI monitor accessible to you.
- Have a second working Raspberry Pi or Linux System / Boot CD available to you. (We will use a second Raspberry Pi in this walk through)
Getting started:
- Start by booting up the Raspberry Pi that is not working. To avoid miscommunication in this we will call the Raspberry Pi that is not working BorkedPi.
- Connect BorkedPi to your HDMI monitor so that we can get a visual of BorkedPI booting up.
- Once BorkedPi begins to boot up you will be greated with a message that says something like: A start job is running for dev-sda.device Then a count down of about 90 seconds or so will begin.
- Once the count down has finished you will be asked to enter your sudo password. Proceed with entering your password. If you were able to get logged in you can skip to step #19 of this article.
- If your password fails to work chances are that the Raspberry Pi is unable to find your boot partition. No big deal, we can certainly fix this!
- Proceed with turning off BorkedPi and unplug any external hard drive that may be plugged into it.
- Once BorkedPi is completely turned off, move forward with removing the MicroSD Card from the SD Card slot.
- Once the MicroSD Card has been removed insert it into your SDCard Reader as we will need to plug this in shortly into your working RaspberryPi.
- To avoid any miscommunication we will call the second (working) Raspberry Pi as WorkingPi.
- Unplug the HDMI monitor from BorkedPi and plug it into WorkingPi so that we can get a visual of what we are doing and the files we are editing.
- Plug in the SDCard Reader with the MicroSD Card of BorkedPi into WorkingPI.
- Proceed with booting up WorkingPi and logging in. If you have configured your RaspberryPi to boot into terminal like I do, awesome! If you boot into a Desktop, not a problem…however you will need to open up terminal.
- On the command line or if you are on the desktop begin with opening up terminal.
- Once terminal is open we need to identify our SDCard Reader that is plugged into WorkingPi. To do so run the command
blkidin terminal. This command stands for block identification and it can determine the filesystem, swap, block device holds and also attributes (tokens, NAME=value pairs) from the content metadata (e.g. LABEL or UUID fields). What we are interested in here is the LABEL and UUID fields to determine what we are working with. - Our USB device will say something like: /dev/sdd1 or /dev/sdd2 yours may be different. To see the contents of the SDCard we need to mount the SDCard Reader to our WorkingPi.
- Let’s mount the SDCard Reader! Begin by creating a directory in /mnt by running the following command:
mkdir /mnt/tmp - Now let’s proceed with mounting /dev/sdd1 to /mnt/tmp so that we can see the files. Proceed with running the following command:
sudo mount /dev/sdd1 /mnt/tmp - Once we have our USB Card Reader mounted lets now edit the FSTAB file. It’s this file that our Linux system is having a tough time booting correctly.
- To edit the FSTAB file begin by running:
vim /mnt/tmp/etc/fstab - Then simply add a # to comment out the /dev/sda1 (which was possibly your external hard drives name)
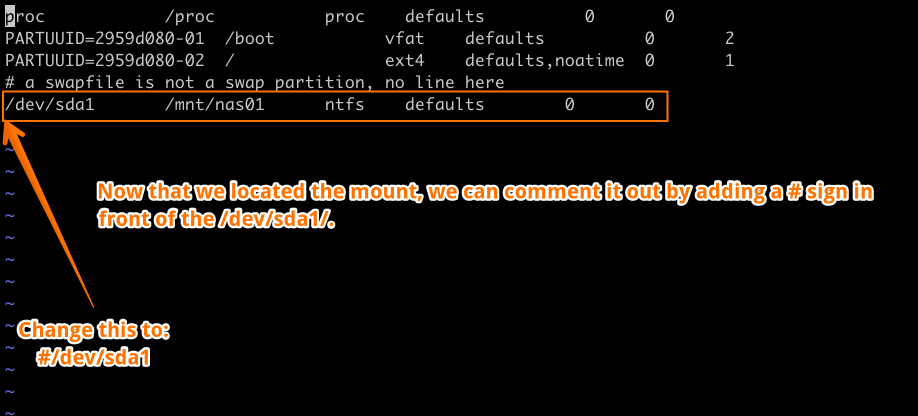
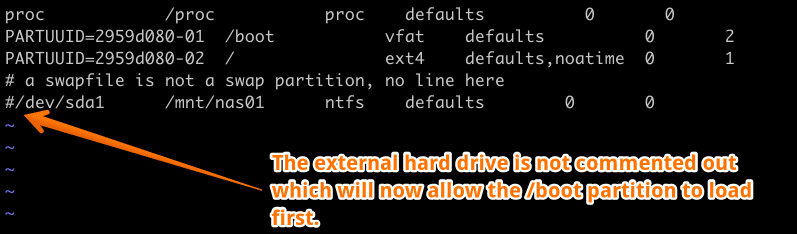
21. After the editing the fstab it should now look like this:
22. Now save the FSTAB file.
22. The external hard drive is now commented out which will now allow the /boot partition to load first.
23. We should be all set! Now proceed with un-mounting our SDCard Reader with the following command: sudo umount -f /mnt/tmp
24. Great, now let’s proceed with shutting down our WorkingPI so we can remove the SDCard from the USB Reader and place it back into BorkedPi.
25. To shut down WorkingPi run the following command: sudo shutdown -h now
26. Now remove the SD Card from the SDCard Reader after the shut down and insert the SDCard back into BorkedPi.
27. BorkedPi should now boot with no issue as it’s now able to see the /boot partition.
28. If you would like to re-mount your external hard drive to BorkedPi you can now do so by following the instructions in this article: How to mount an external hard drive on linux
Conclusion:
Well that was quite the write up there and certainly a fair amount of steps that we had to do. When creating this blog post I did not want to make any assumptions and it’s for that reason I wanted to do a complete write up for you with 100% follow through. I do hope this helps, and if you have questions leave a comment for me below.
Leave A Comment