
Setting up SendGrid with WordPress at WP Engine
In this entry I will give a walk through on how to install the SendGrid Plugin on WordPress with WP Engine. Then we we will walk through the steps on how to configure it utilizing the API and Domain Validating our website for deliverability. Please be aware that the following this article comes “as is” and you will not hold myself David Polanco, WP Engine®, SendGrid© for any misconfiguration or issues that may occur. This walkthrough is to be used as is and as a reference.
Here are a few things that you will need:
- A WordPress site on WP Engine
- The ability to manage your DNS with your Domain Registrar (eg: godaddy, google domains, domain.com)
- The SendGrid Plugin installed on your WordPress site.
- A free trial account with SendGrid
The nice thing about SendGrid is that they do offer a 40,000 free emails for your first 30 days in which they explain then you will have the ability to send 100 a day until the depletion of the 40,000 emails. Some of the perks of the Free Trial plan includes:
- Flexible template editors
- Segmentation
- A/B Testing.
- The reassurance that your email will be delivered and logged.
- Real-time analytics and tracking
- Data rich email activity feed
Now then, once you have all these things in front of you, you will with the following steps:
Let’s Sign up for a SendGrid Account:
Begin by heading over to SendGrid.com and clicking on the Try for Free Button.

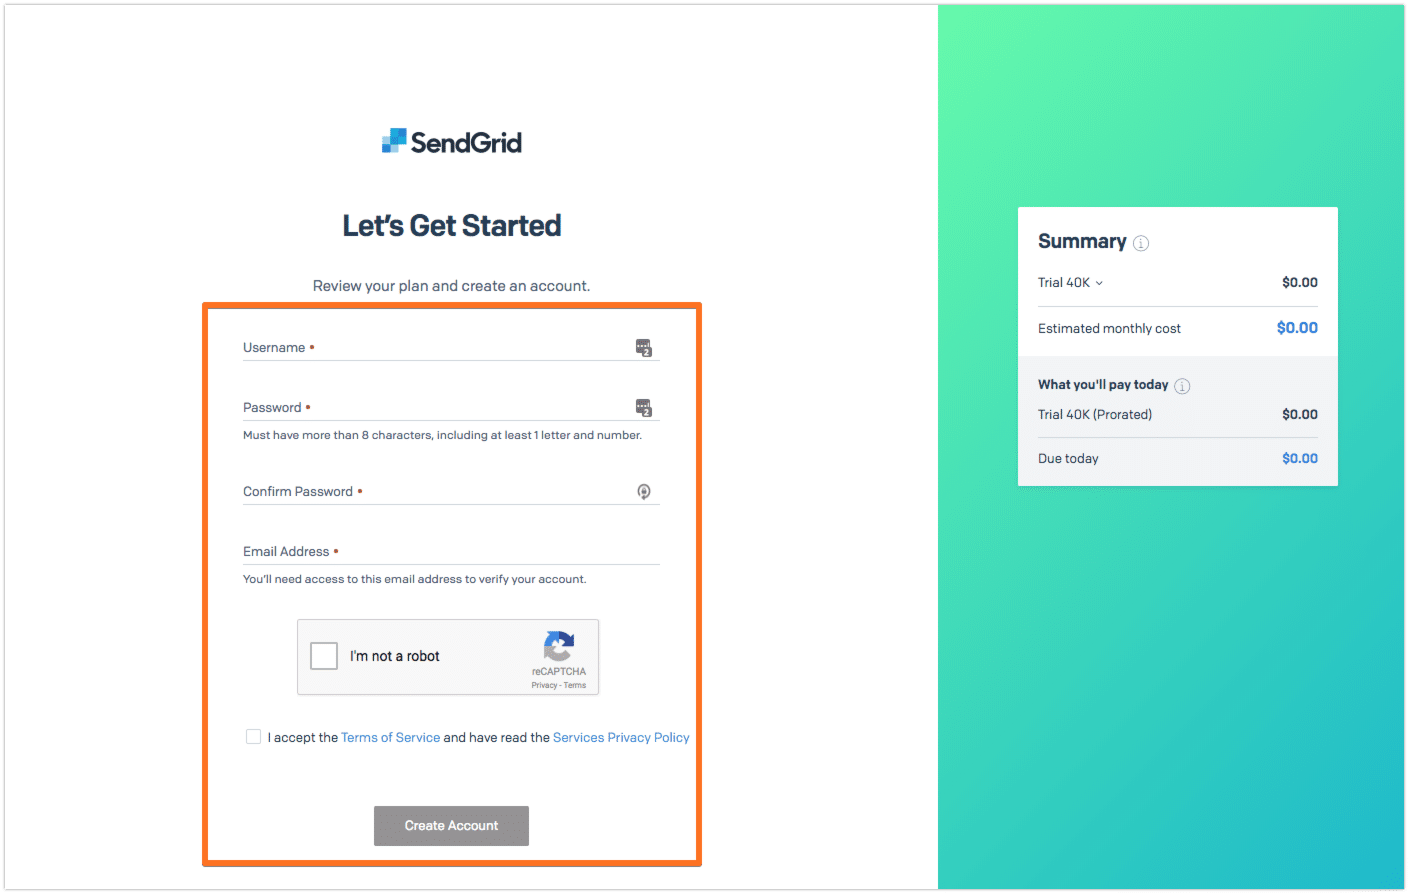
You will then enter some basic information such as Username, Password, and Email Address.
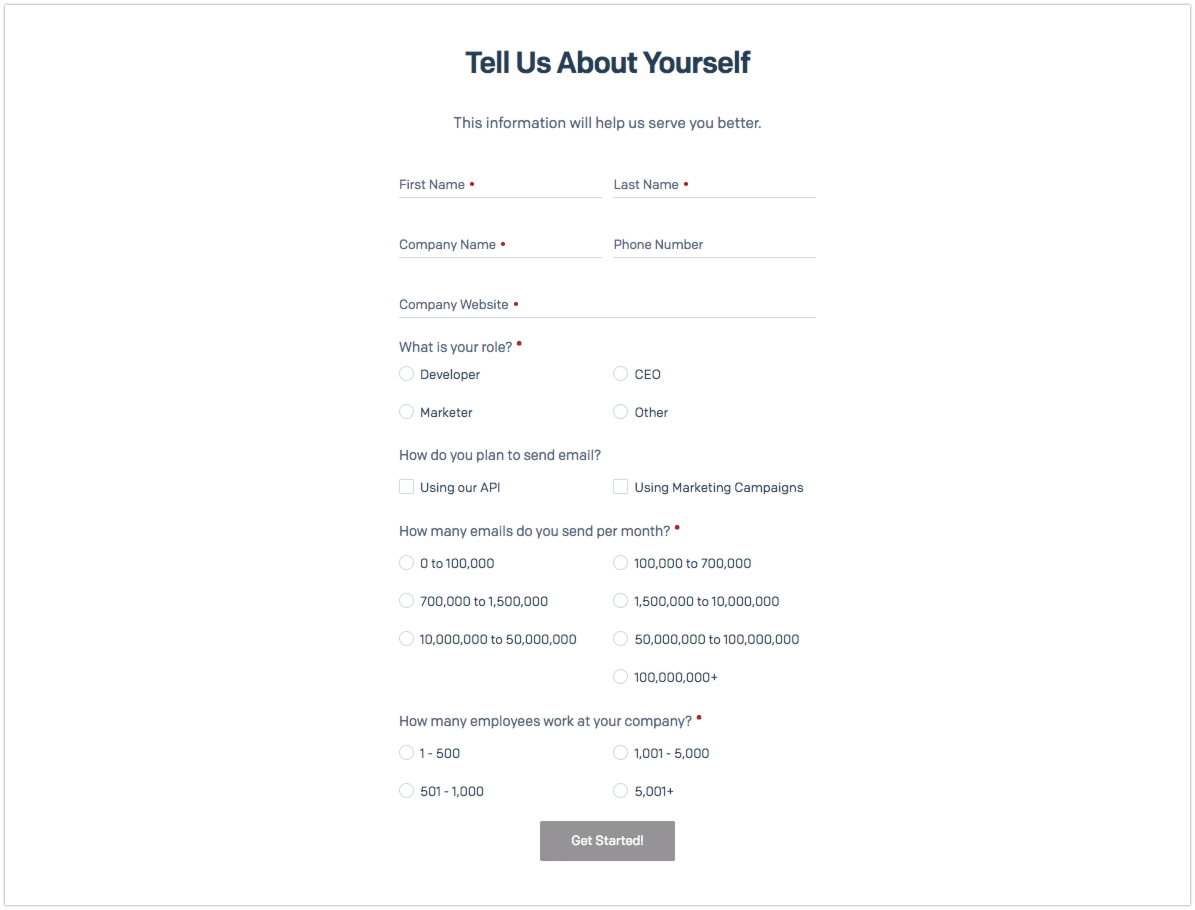
Once you have signed up proceed with telling SendGrid a little bit about how you will be using their service.
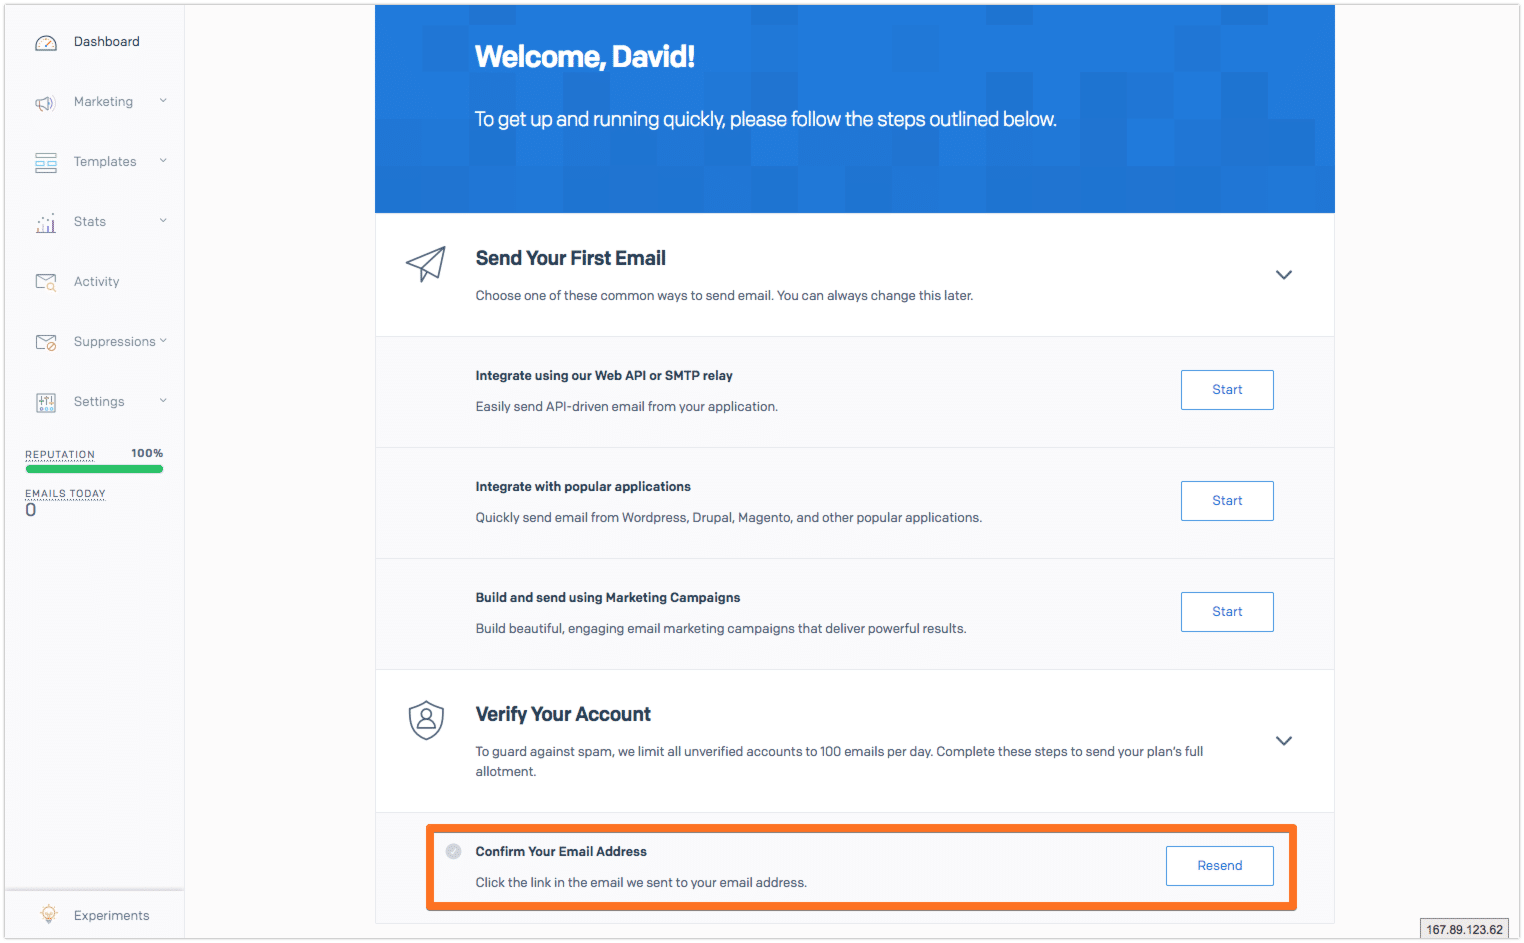
Once this is complete you will be taken to the Dashboard. What I would advise is for you to confirm your email address before getting started. SendGrid mentions:
To Guard against spam, we limit all unverified accounts to 100 emails per day. Complete these steps to send your plan’s full allotment.
Do keep in mind that SendGrid does have it’s SendGrid WordPress Documentation available to you should you need to reference it. As mentioned by SendGrid in their documentation:
SendGrid’s WordPress plugin replaces WordPress’s default wp_mail() function by using either an SMTP or API integration with SendGrid to send outgoing email from your WordPress installation. It also allows you to upload contacts directly to your SendGrid Marketing Campaigns account via a subscription widget.
Moving forward we will now need to install the SendGrid WordPress Plugin however we will also need the Swift Mailer plugin installed to sit along side of it. Keep in mind to get the SendGrid plugin running after you have activated Swift Mailer.
So let’s get started with installing the SendGrid and SwiftMailer Plugin.
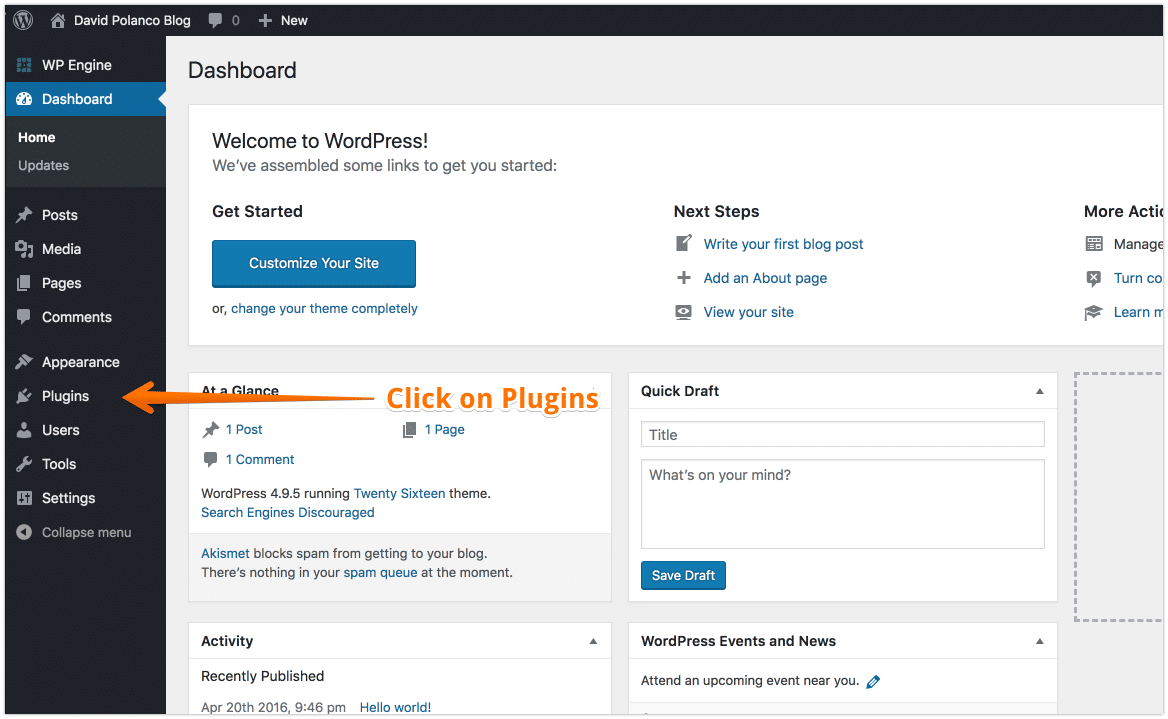
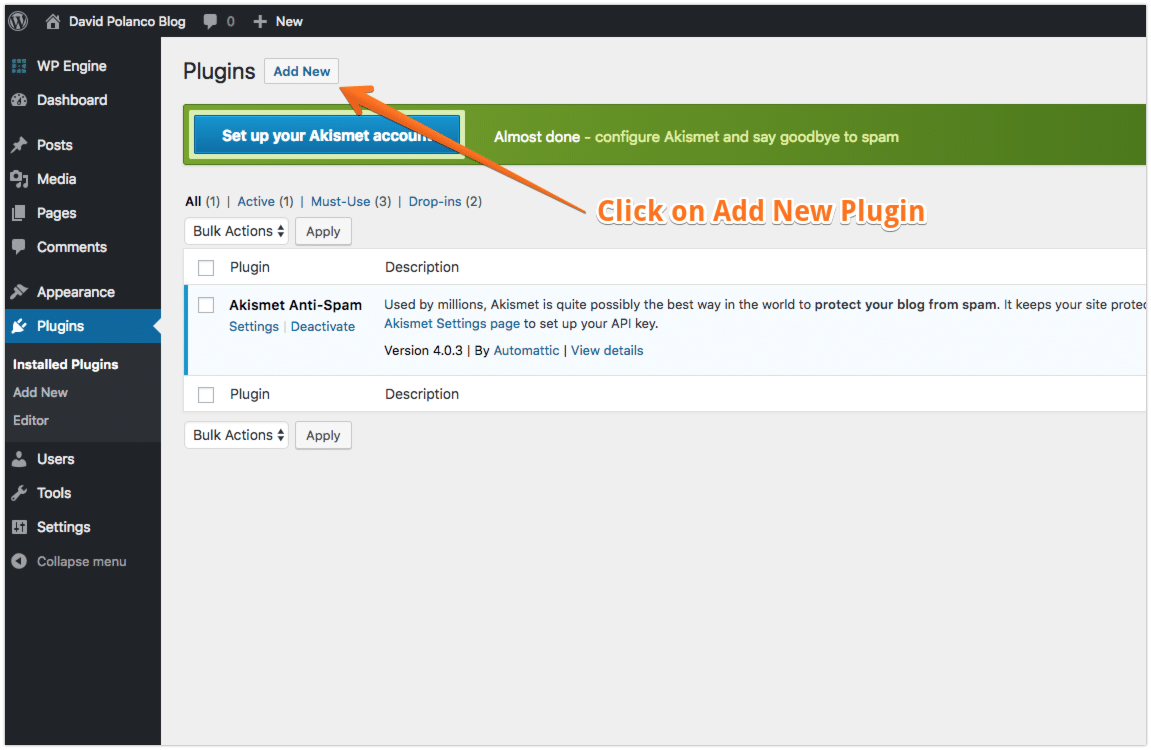
01. Start by logging into your WordPress Admin and clicking on Plugins:
02. Once that is done click on Add New plugin as we will need to install 2 plugins (SendGrid and SwiftMailer) to add mail functionality to our install.
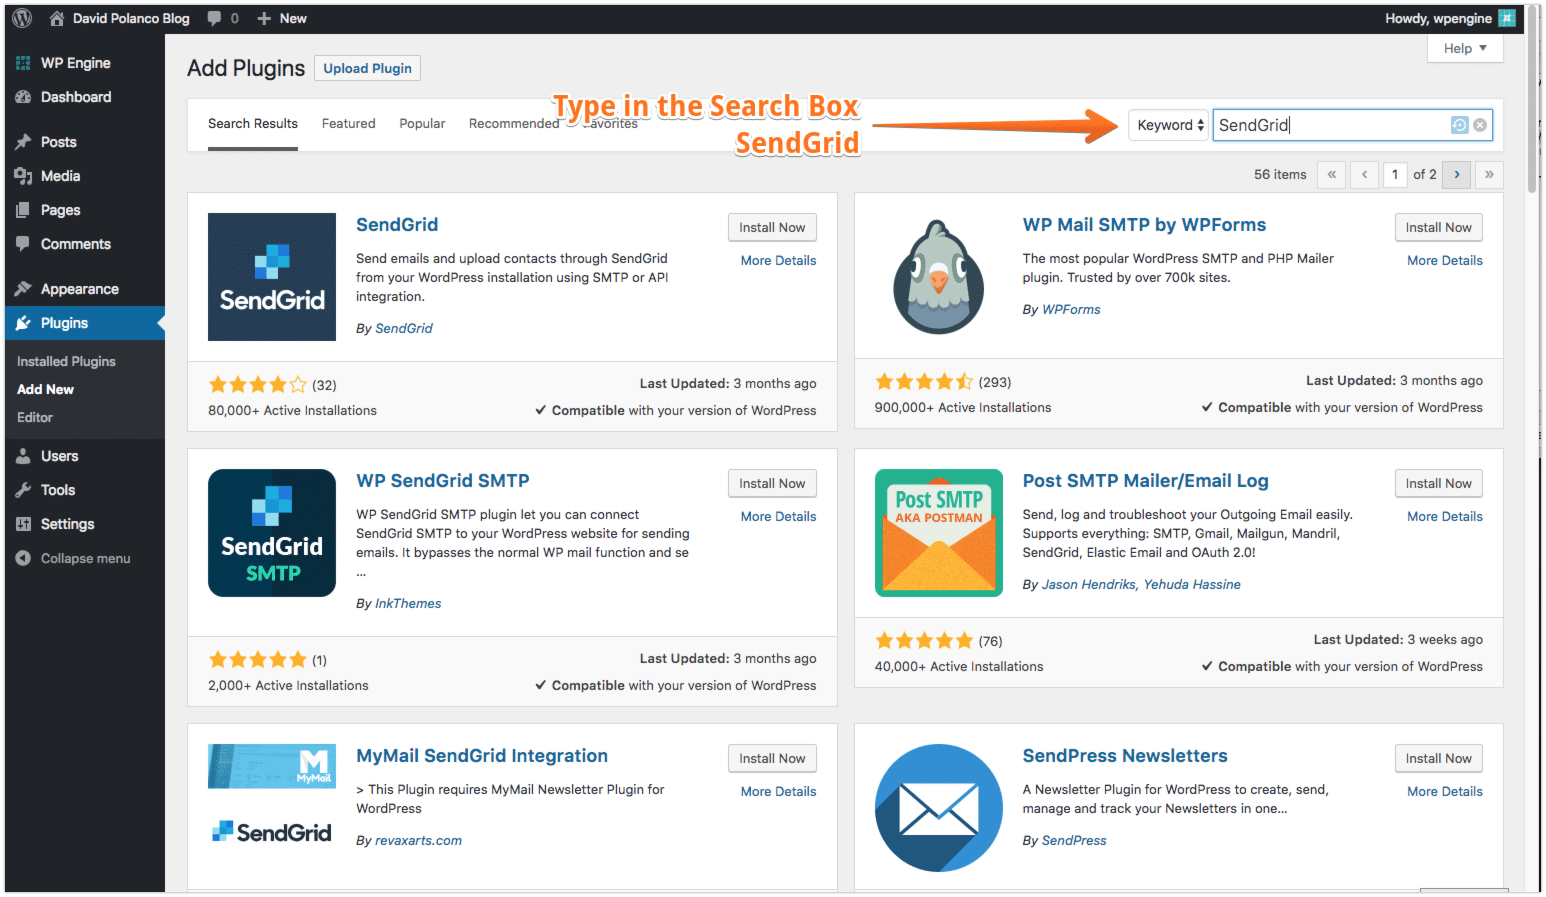
03. Next let’s type in the Search Box under the keyword: SendGrid
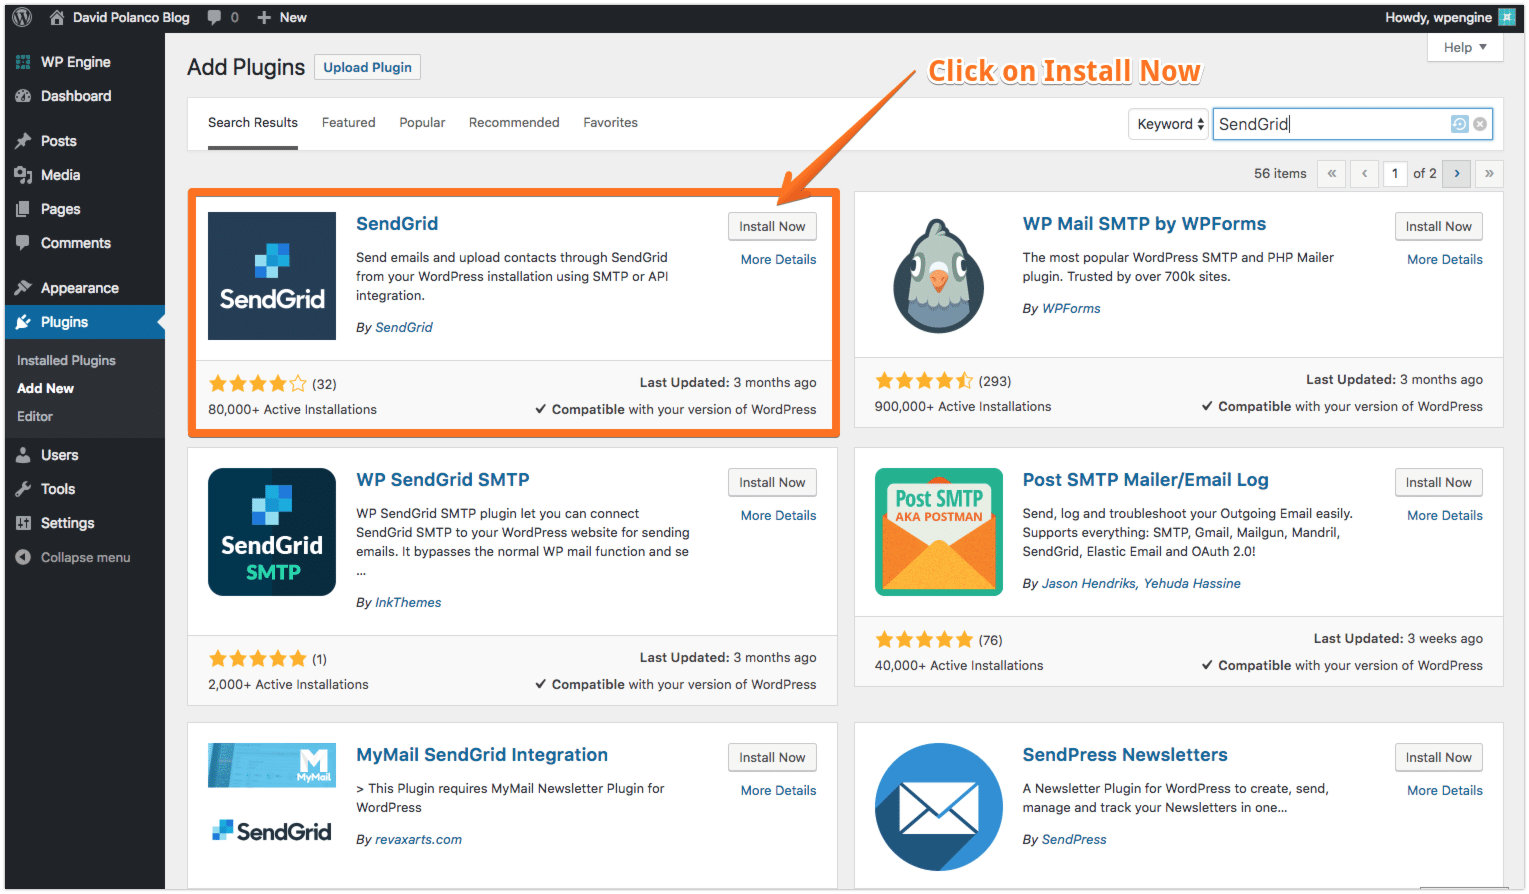
04. Once that is completed let’s click and Install the SendGrid Plugin By SendGrid – It’s description states “Send emails and upload contacts through SendGrid from your WordPress installation using SMTP or API integration”. Do ensure that you are using the plugin that was developed by SendGrid.
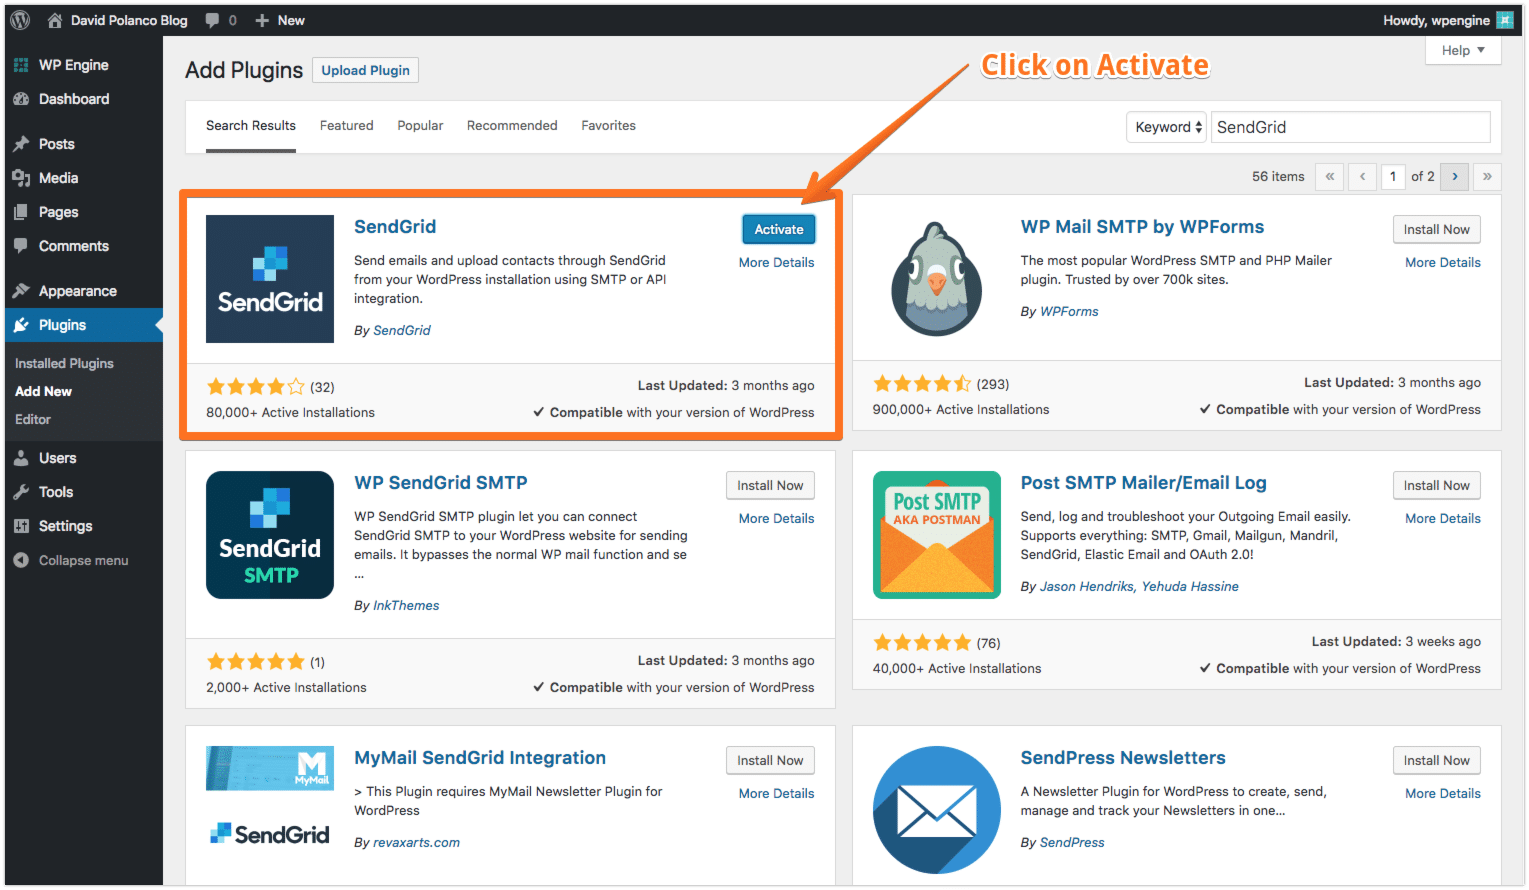
05. Once the plugin is installed we must now click on activate.
Now we should be taken to the Plugins page where we can see that the SendGrid Plugin activated. However we still need to add the Swift Mail Plugin to our plugin list. (Update 2019-01-13 8:58 PM) – There is no need for the Swift Mailer plugin unless you want to send mail directly via SMTP as opposed to SendGrid’s API. Thanks Glen for mentioning this in the comments

06. To begin this let’s click on Add New on the plugins page that we left off on. Next let’s see about typing into the Search Box under Keyword: SwiftMailer
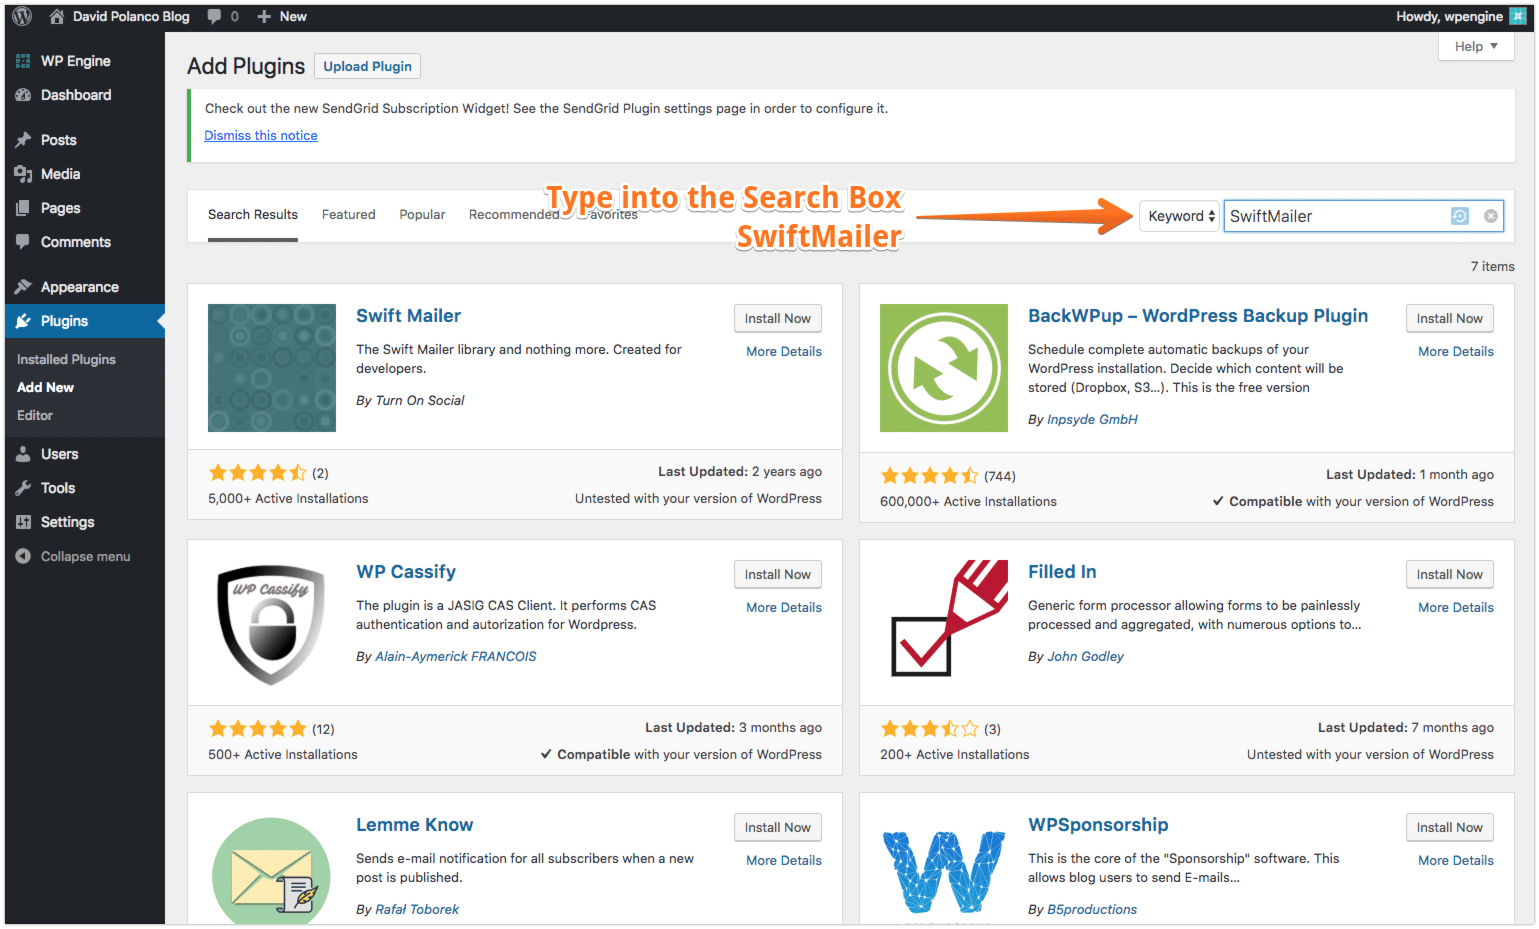
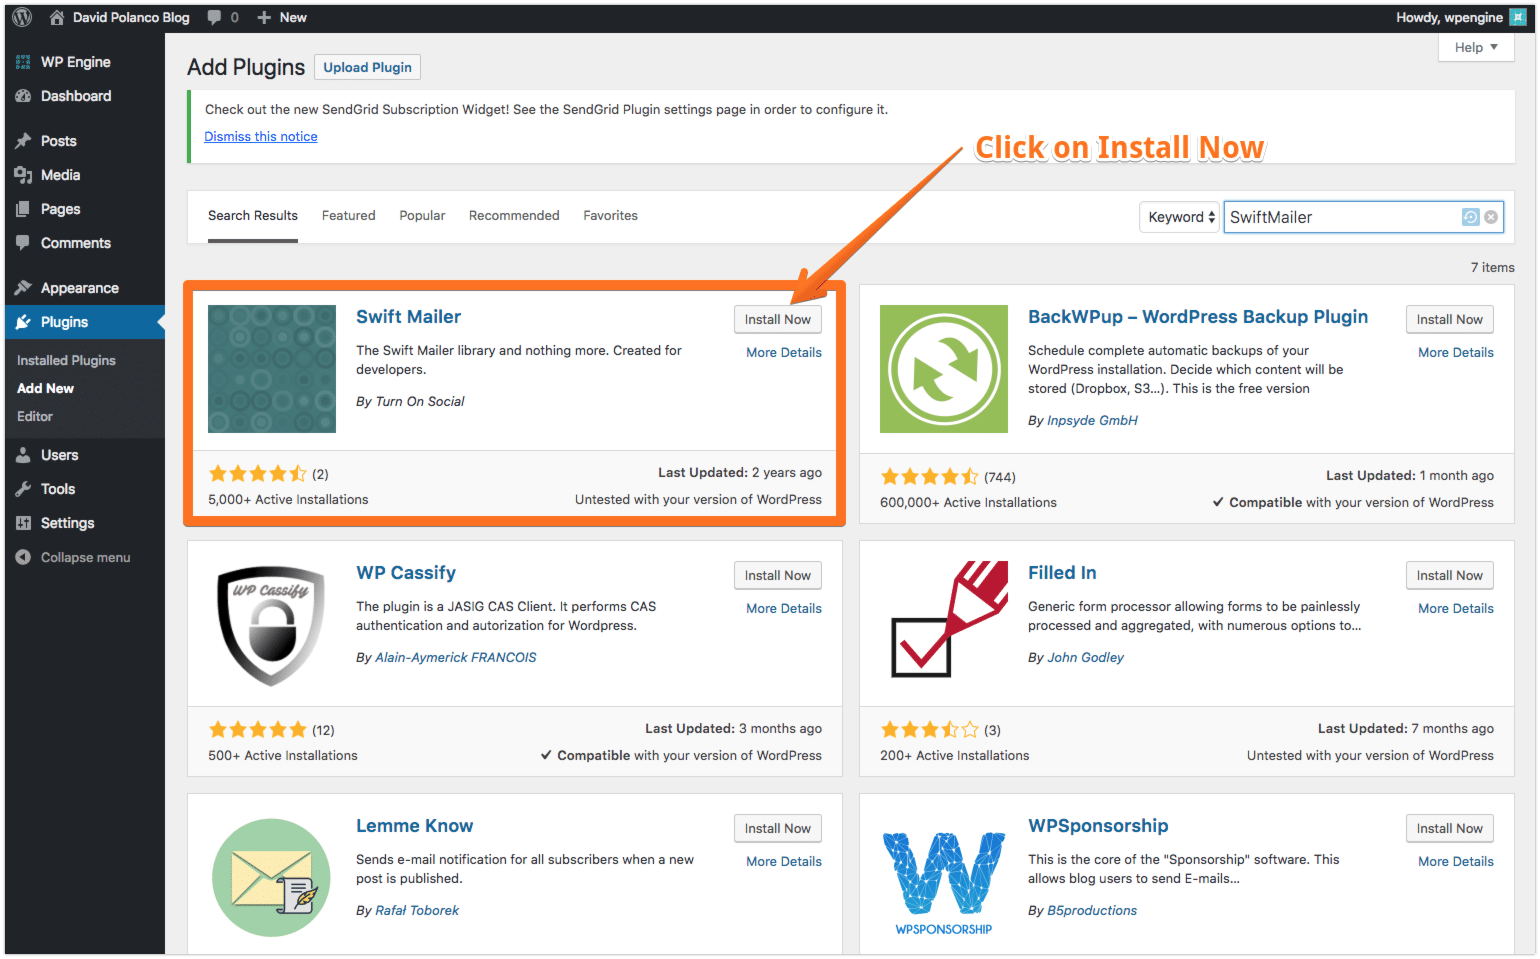
07. This should then show the plugin list again however this time we should see SwiftMailer. Please note that this plugin was created by Turn On Social and is described as: “The Swift Mailer Library and nothing more. Created for developers.” Then simply click install.
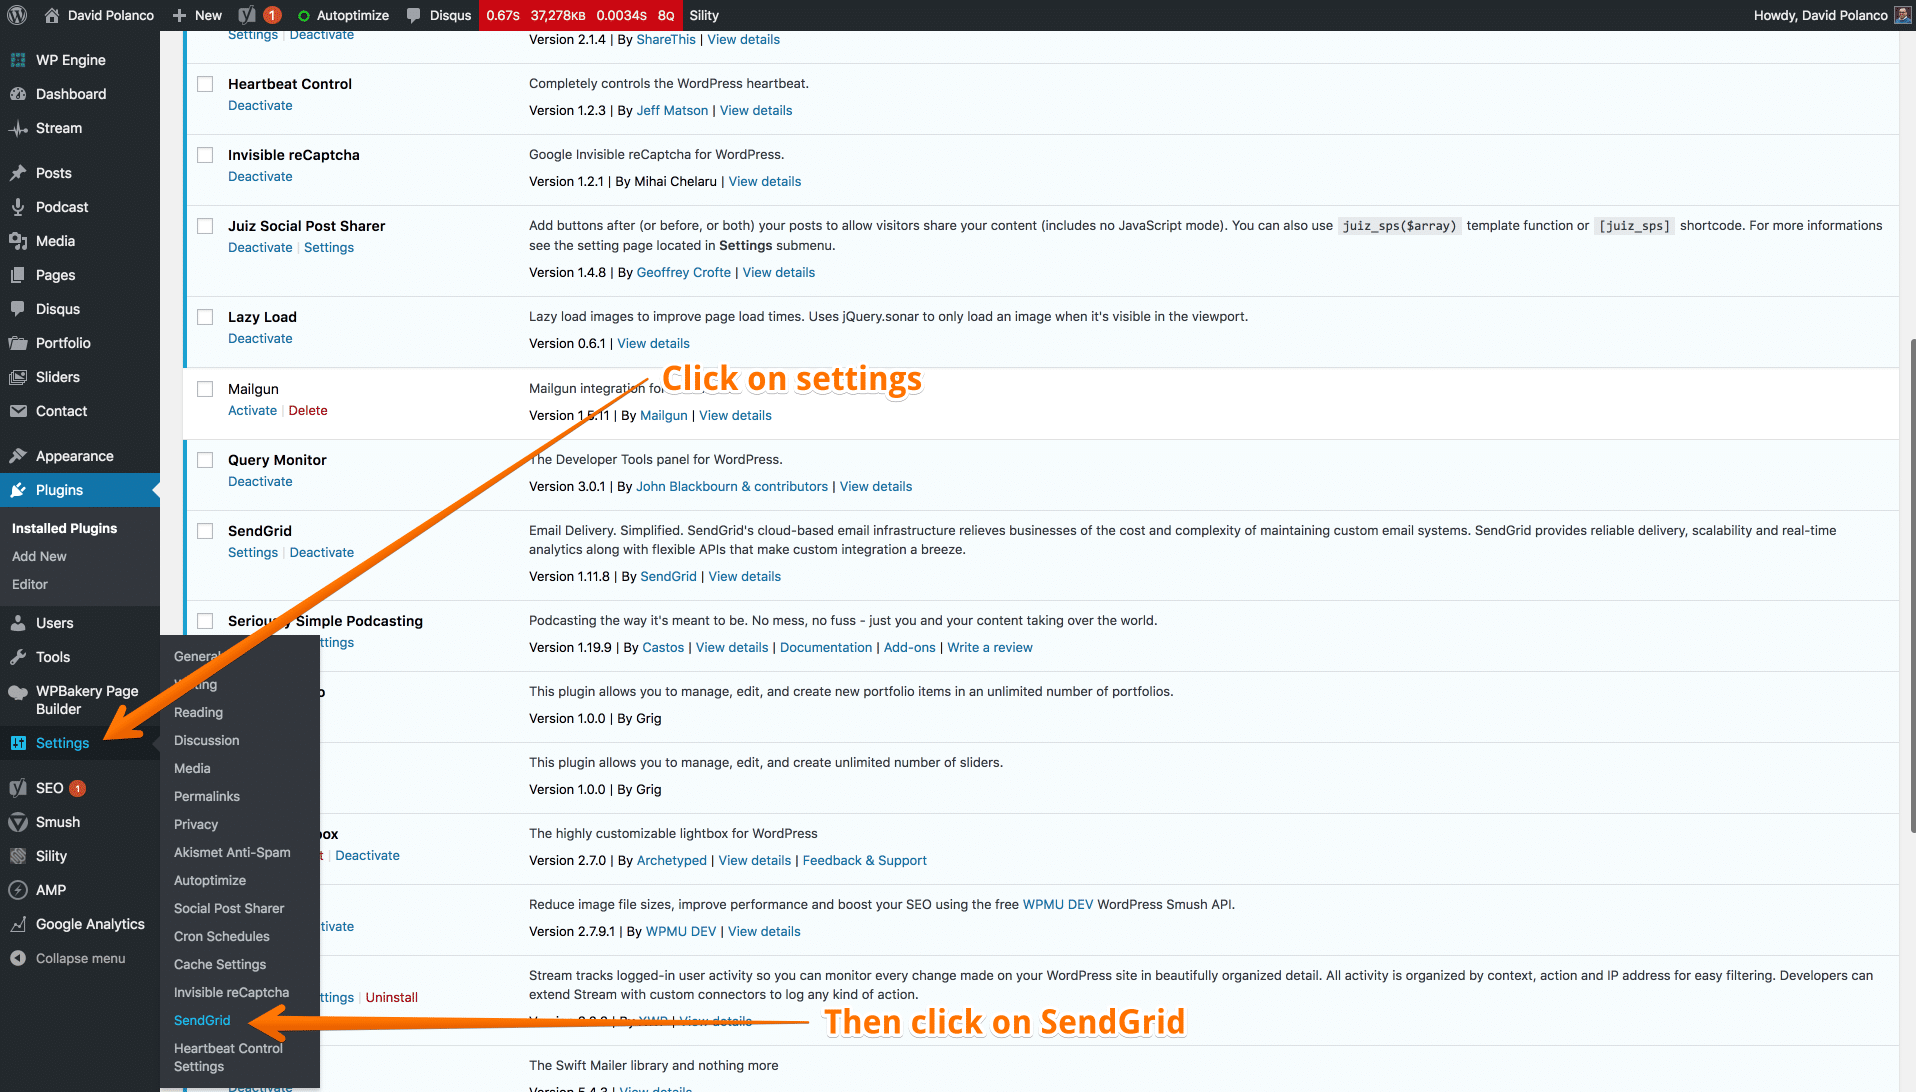
08. Now that we have the SendGrid Plugin and Swift Mailer Plugin activated it is now time to enter our SendGrid credentials. To do so navigate to Settings > SendGrid (as illustrated in the screenshot below.
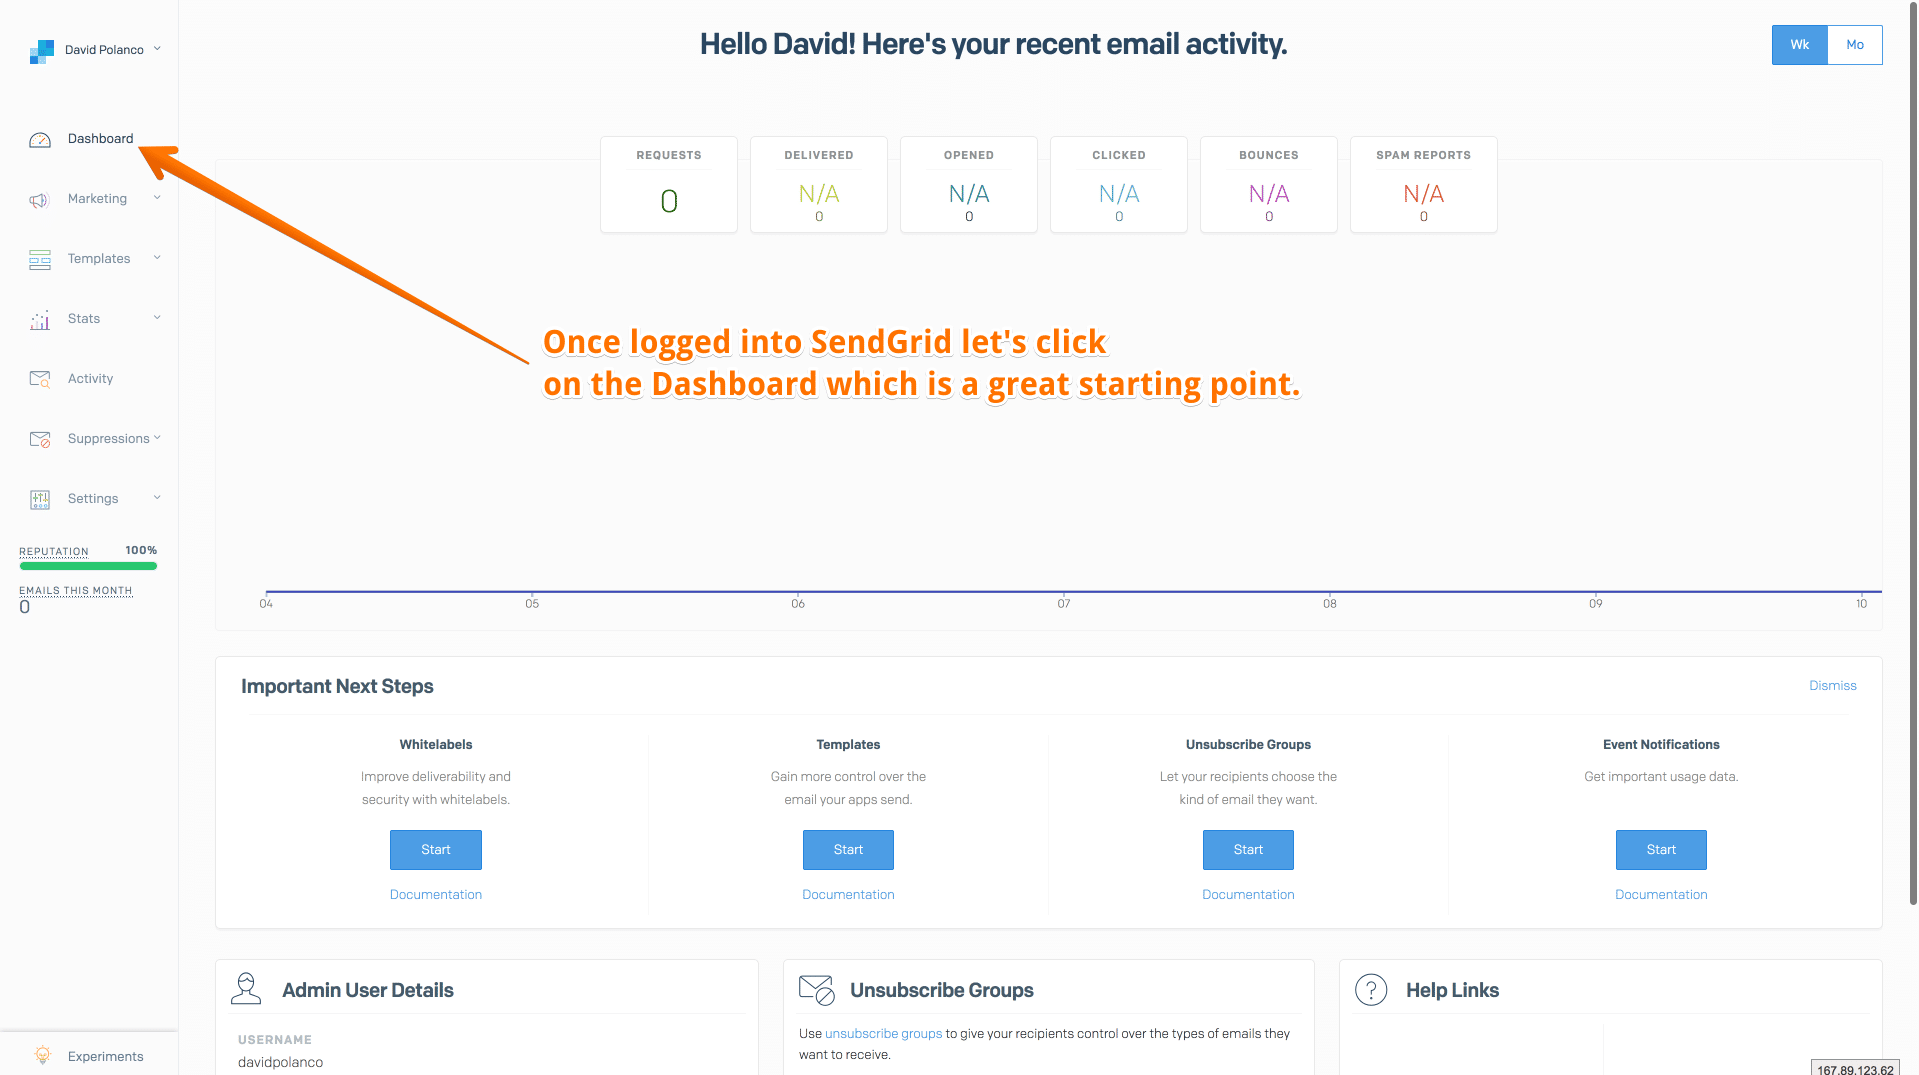
09. Now in a new tab let’s navigate back to SendGrid’s website at: http://sendgrid.com and login to our Dashboard.
10. Now we have the option of setting up SendGrid with our WordPress install with the SendGrid API or SMTP. In our case we will choose the API so that we are not limited to certain ports via SMTP. So on the Dashboard in SendGrid we will click on Settings > API Keys.
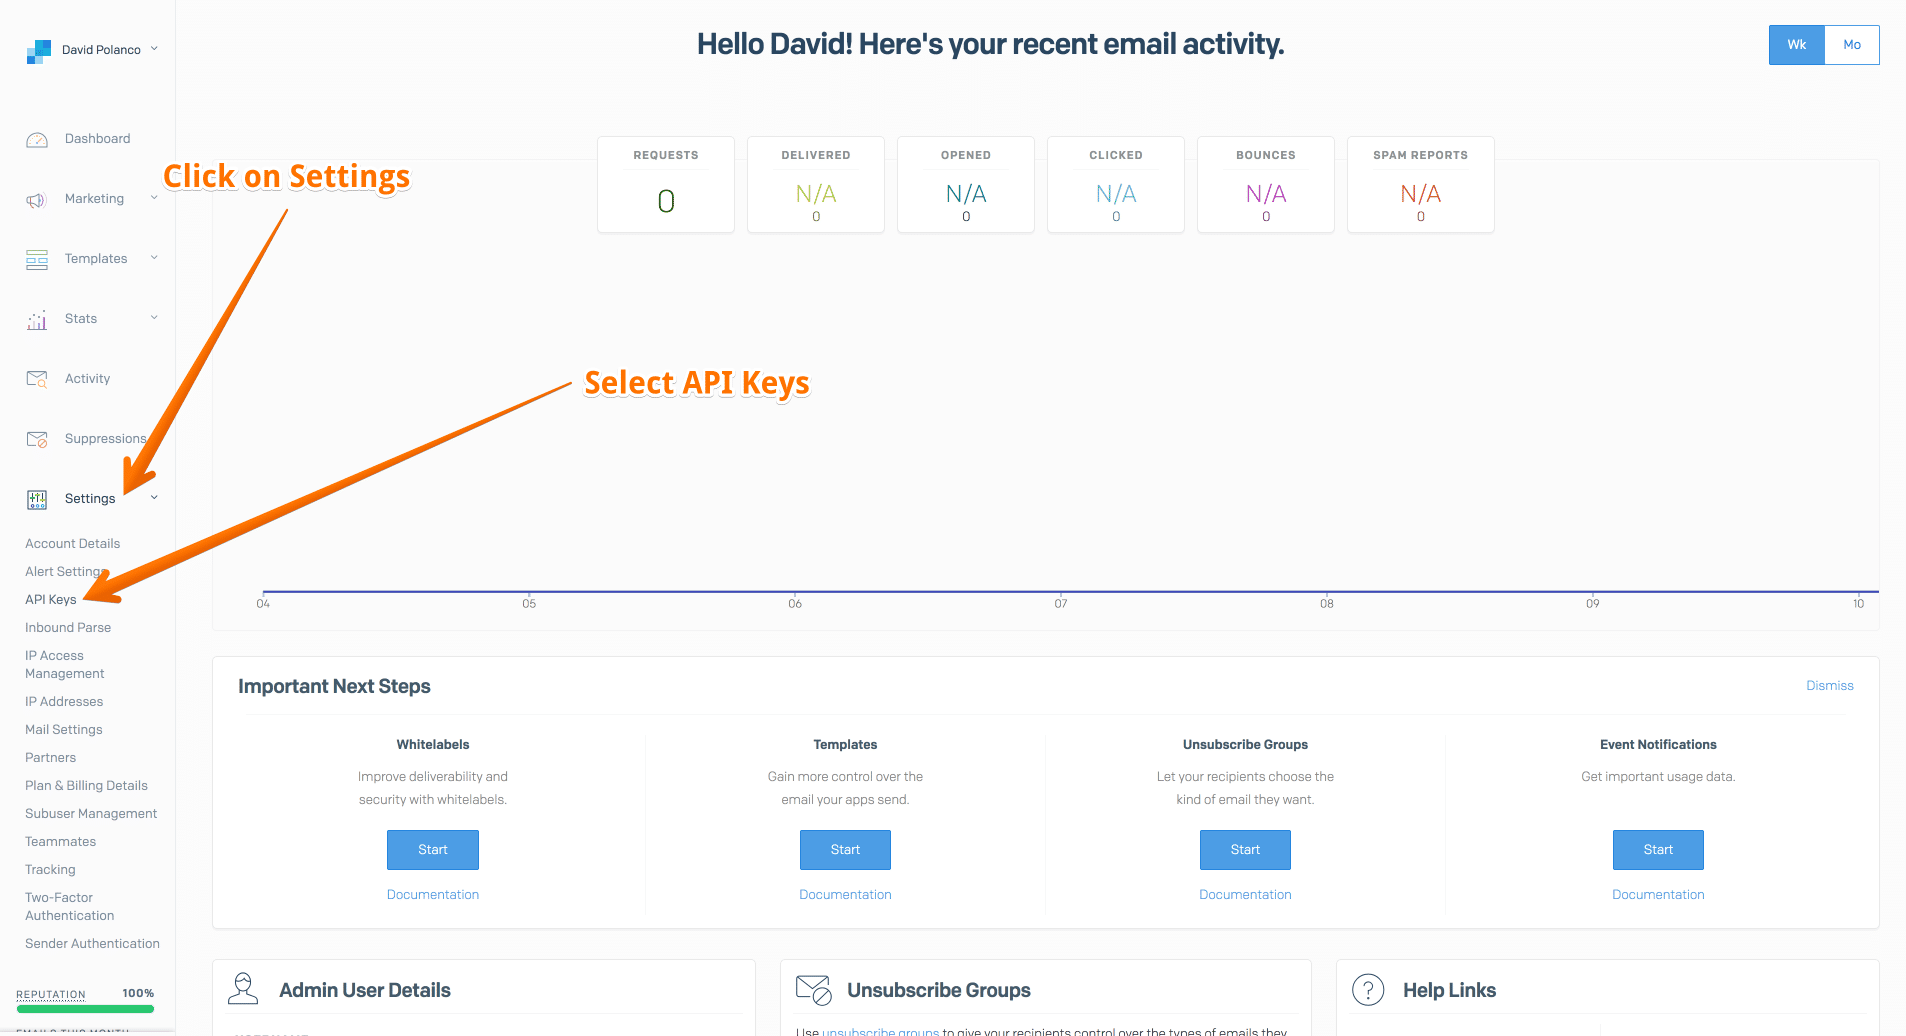
11. Ok now it’s time for use to generate an API Key. It’s important to note that we do not want to share this key with anyone.

12. Once the Create API Button is clicked as illustrated in the screenshot above we are now given a few options.
First we need an API Key Name: David Polanco WordPress
Next select Full Access (Allows the API key to access GET, PATCH, PUT, DELETE, and POST endpoints for all parts of your account, excluding billing.)
Lastly click on Create & View.

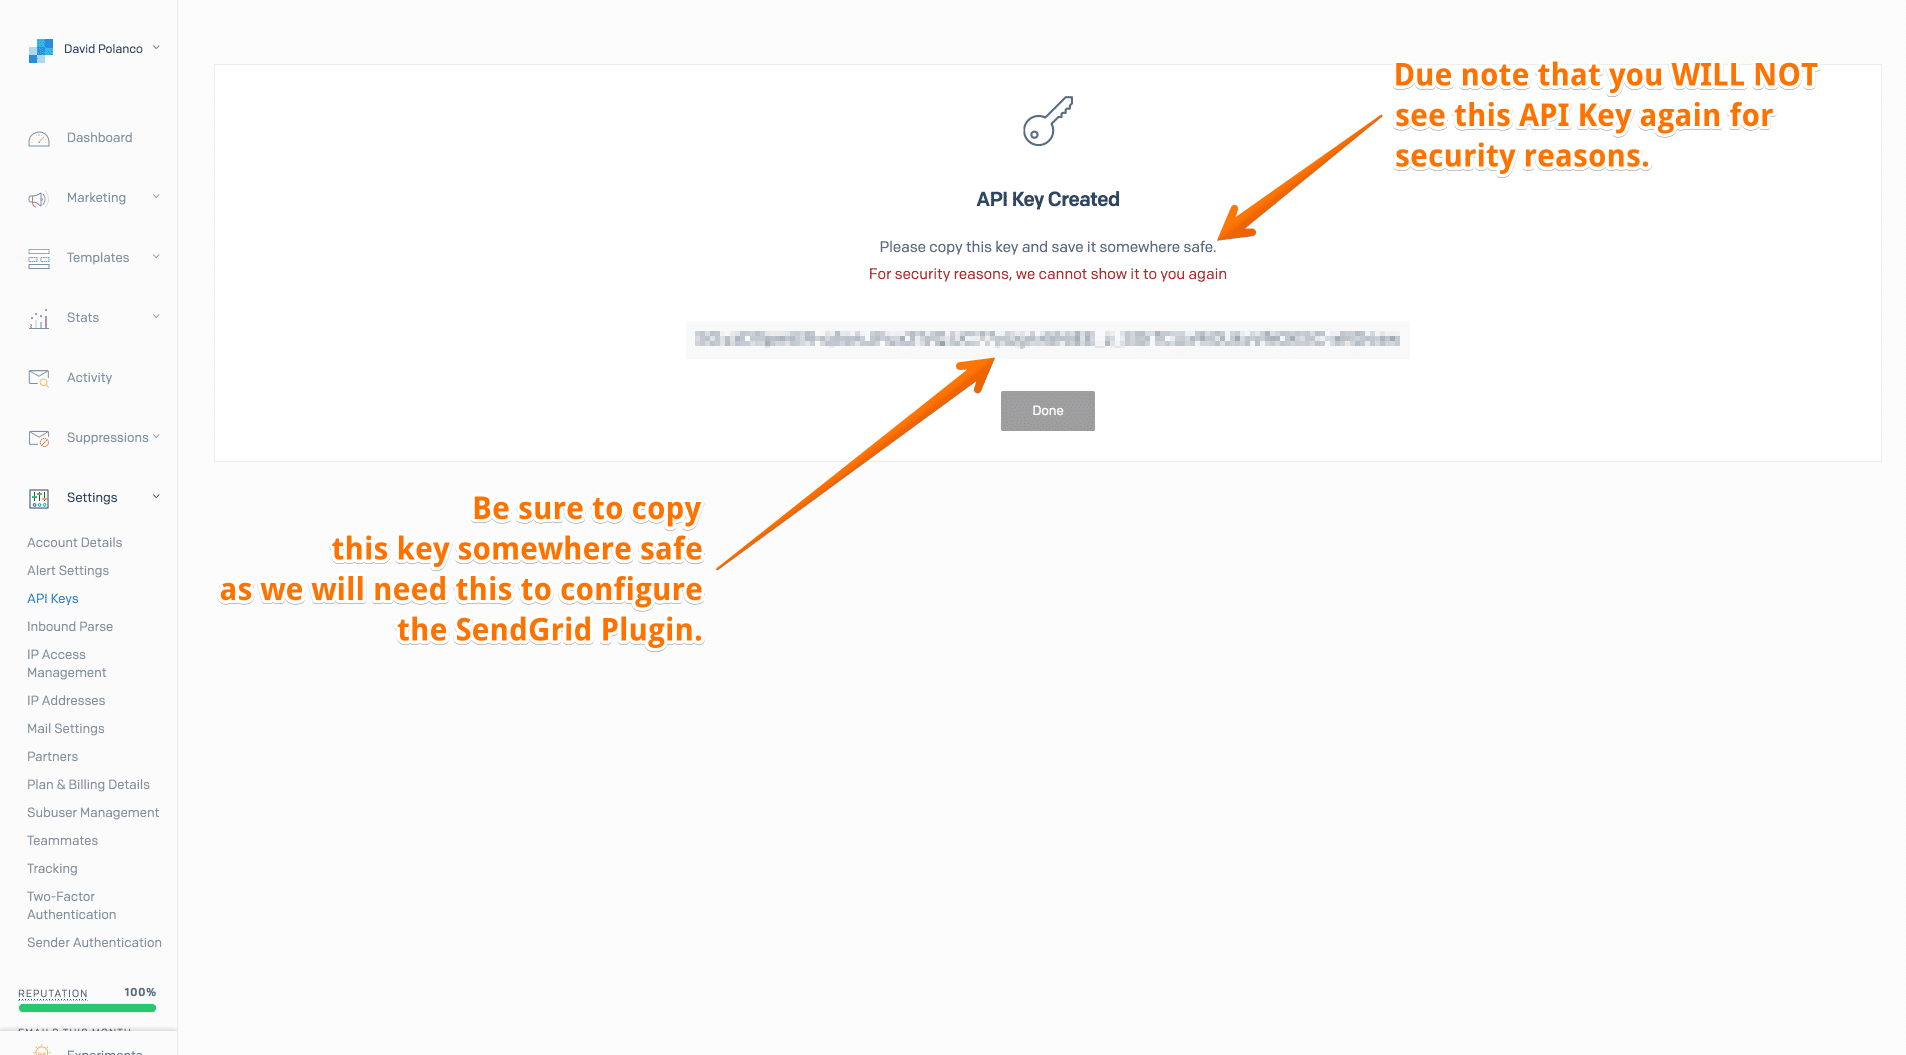
13. Now we are taken to the unique API Key for our WordPress site. Do copy this key somewhere save so that it can be referenced later (when we configure the SendGrid Plugin) Do keep in mind that it is mentioned that: “For security reasons, we cannot show it to you again“. So do not lose this! Once it’s copied somewhere safe click on DONE.
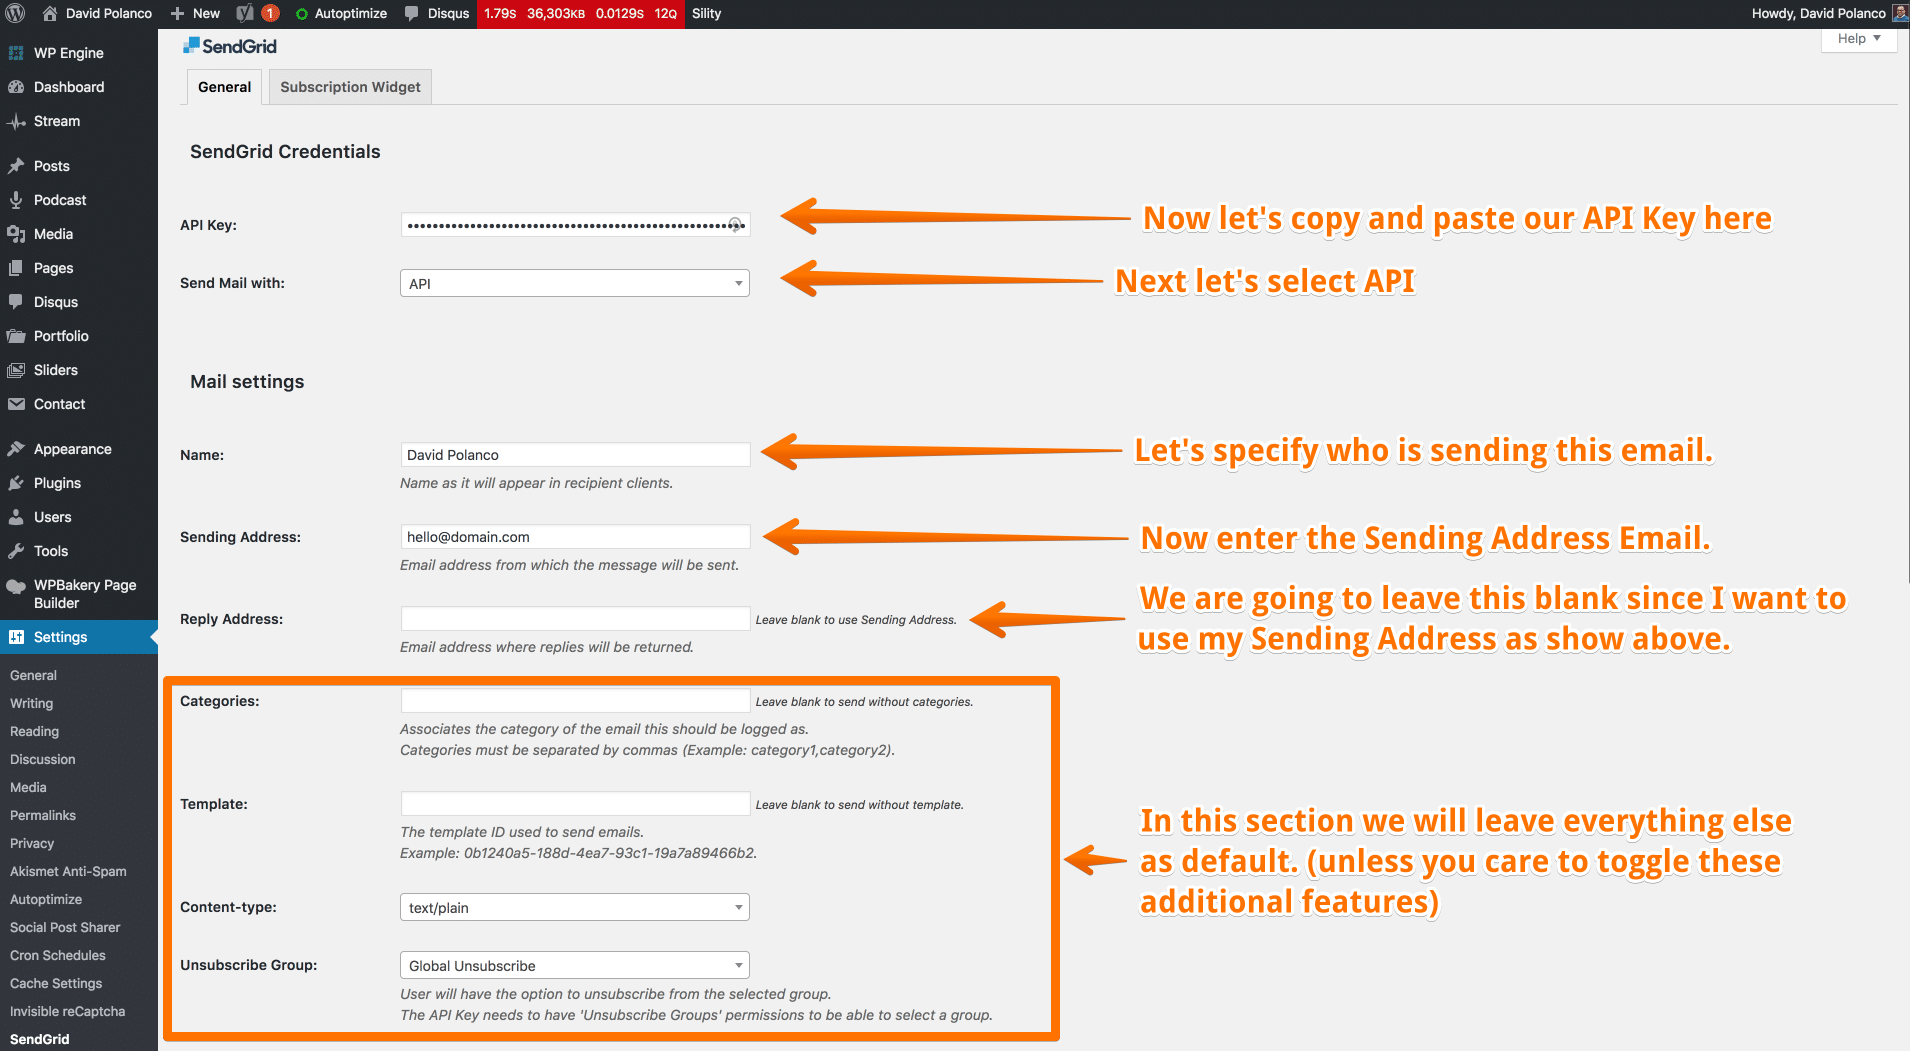
14. Let’s navigate to the SendGrid Plugin inside of our WordPress site as mentioned in our Step 13 above. Let’s now paste our API Key that we got from SendGrid.com and select Send Mail with API. Please use this time to configure your SendGrid settings just like I have below:
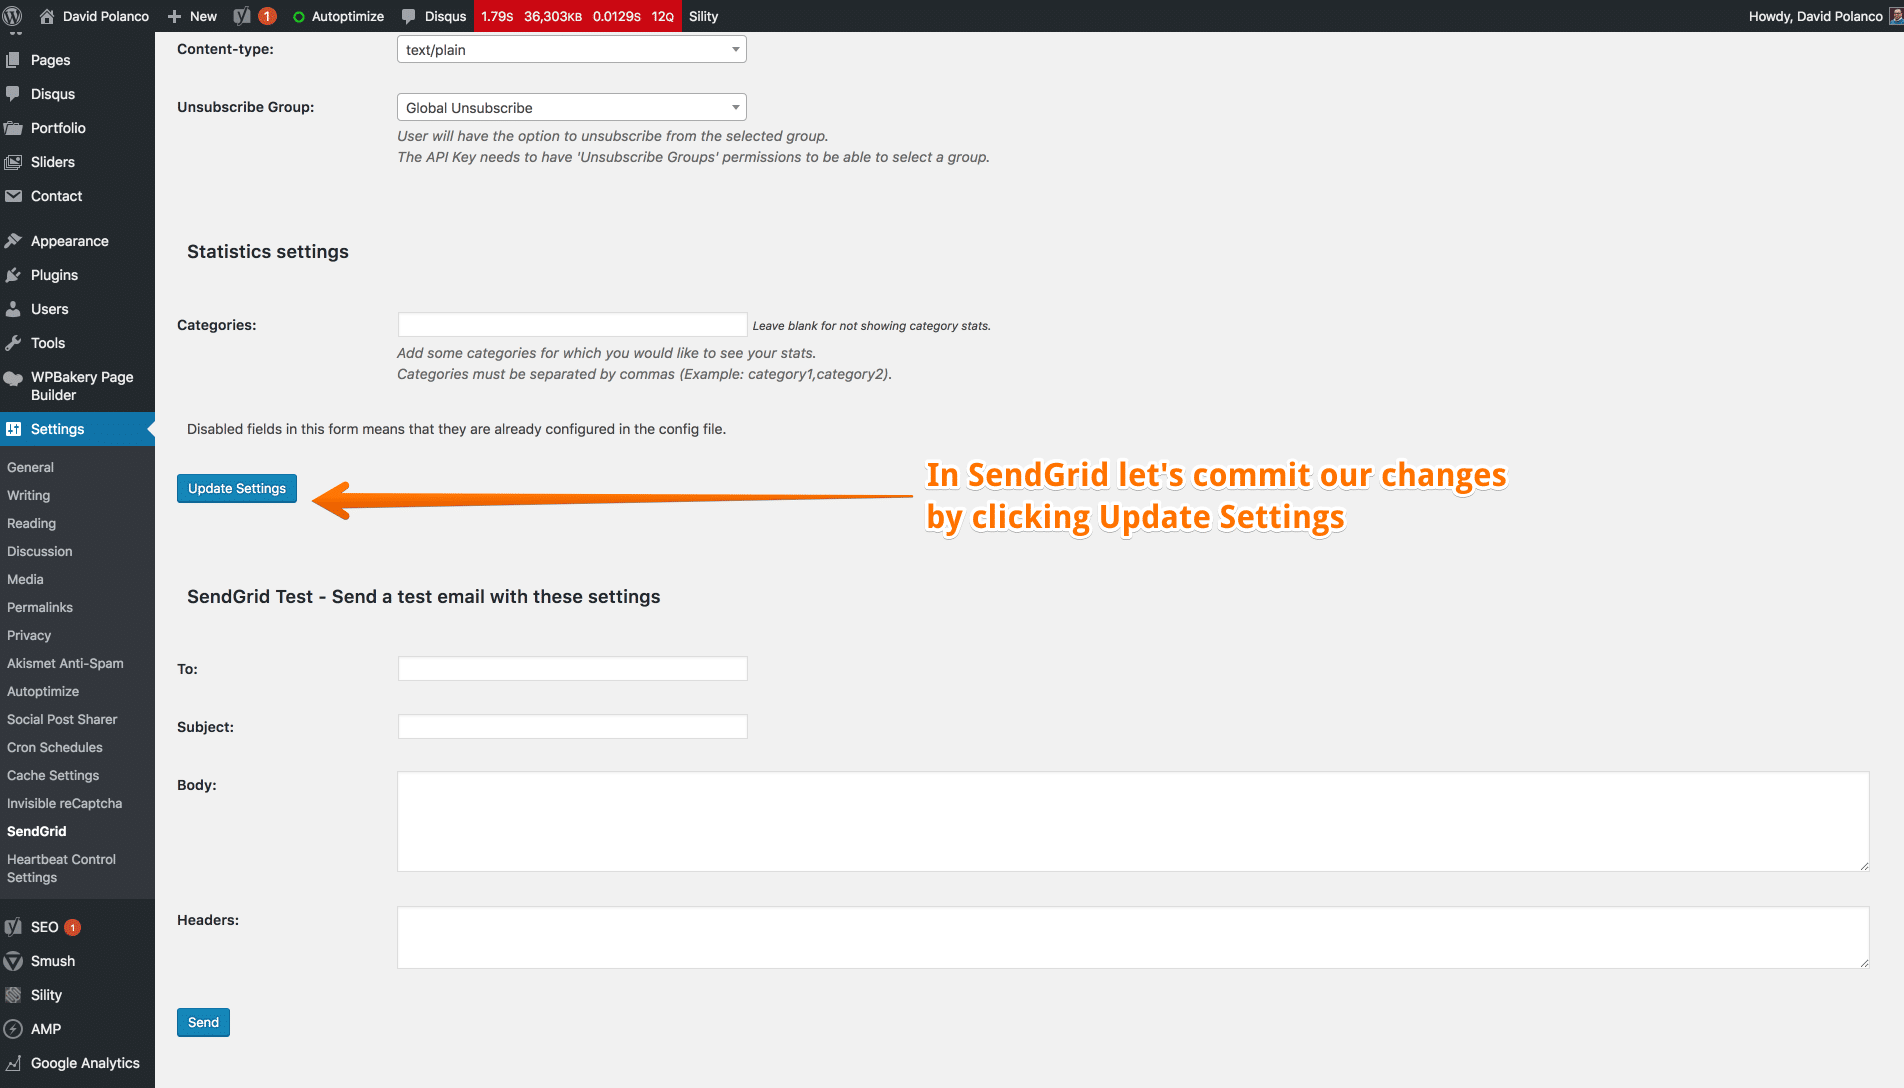
15. Now if we scroll down the same page let’s click on Update Settings as illustrated below:
SendGrid Domain Validation and DNS Setup:
Now then, the “fun” stuff. You will be required to login to your domain registrar (GoDaddy, Domain.com, NetworkSolutions, NameCheap) This is basically the place where you registered your domains or manage your nameservers. If you manage your own NameServers than simply proceed with the steps below in your own interface. In the example below I will be providing screenshots in from the SendGrid site and on my DNS Provider CloudFlare.
Once logged into your domain registrar if you do not know who your domain registrar is take a look at DomainTools Whois Lookup tool, then proceed to something called DNS or Manage DNS/Sites. These names do very from site to site however if you have any issues reach out to your domain name provider.
Now then back inside of SendGrid we need to see about getting Domain Validation setup. This is important as we would like for email deliverability at 100%. If we fail to setup Domain Validation chances are that our emails will be sent to the recipients spam folder and will never be seen. 🙁
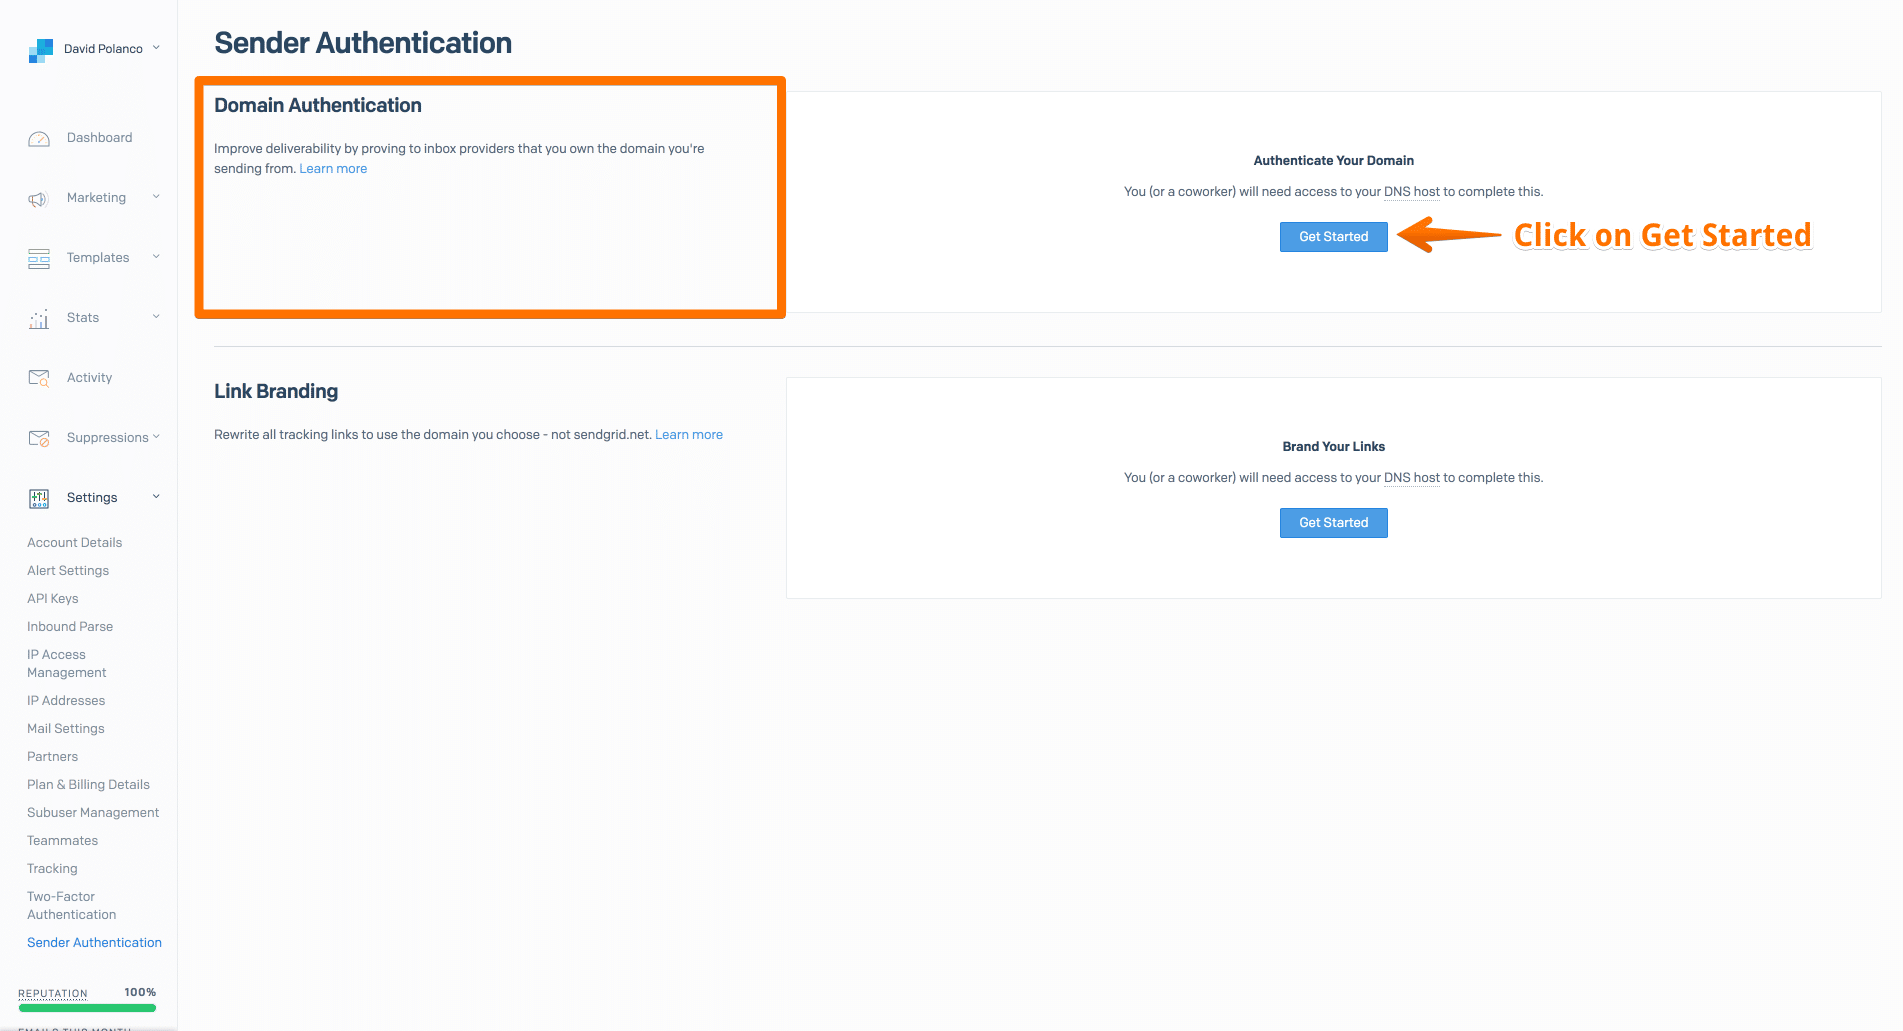
16. Let’s get started back at SendGrid at the Dashboard as mentioned on Step 09. However this time we will click on Settings > Sender Authentication as illustrated below.

17. Once on this page we are given 2 options. However we will be focused on Domain Authentication which mentions to us: “Improve deliverability by proving to inbox providers that you own the domain you’re sending from.” Now click on the Get Started button as shown below.
18. Now it’s up to us to select our DNS provider / host. In my case I use Google Domains however I have my nameservers set to CloudFlare. So in my case I would select CloudFlare. To make things easy you can use DomainTools Whois Lookup to see who your DNS host is. Once you have know you DNS host (and it’s ok if you do not) follow the screenshot below to move on to our next step.
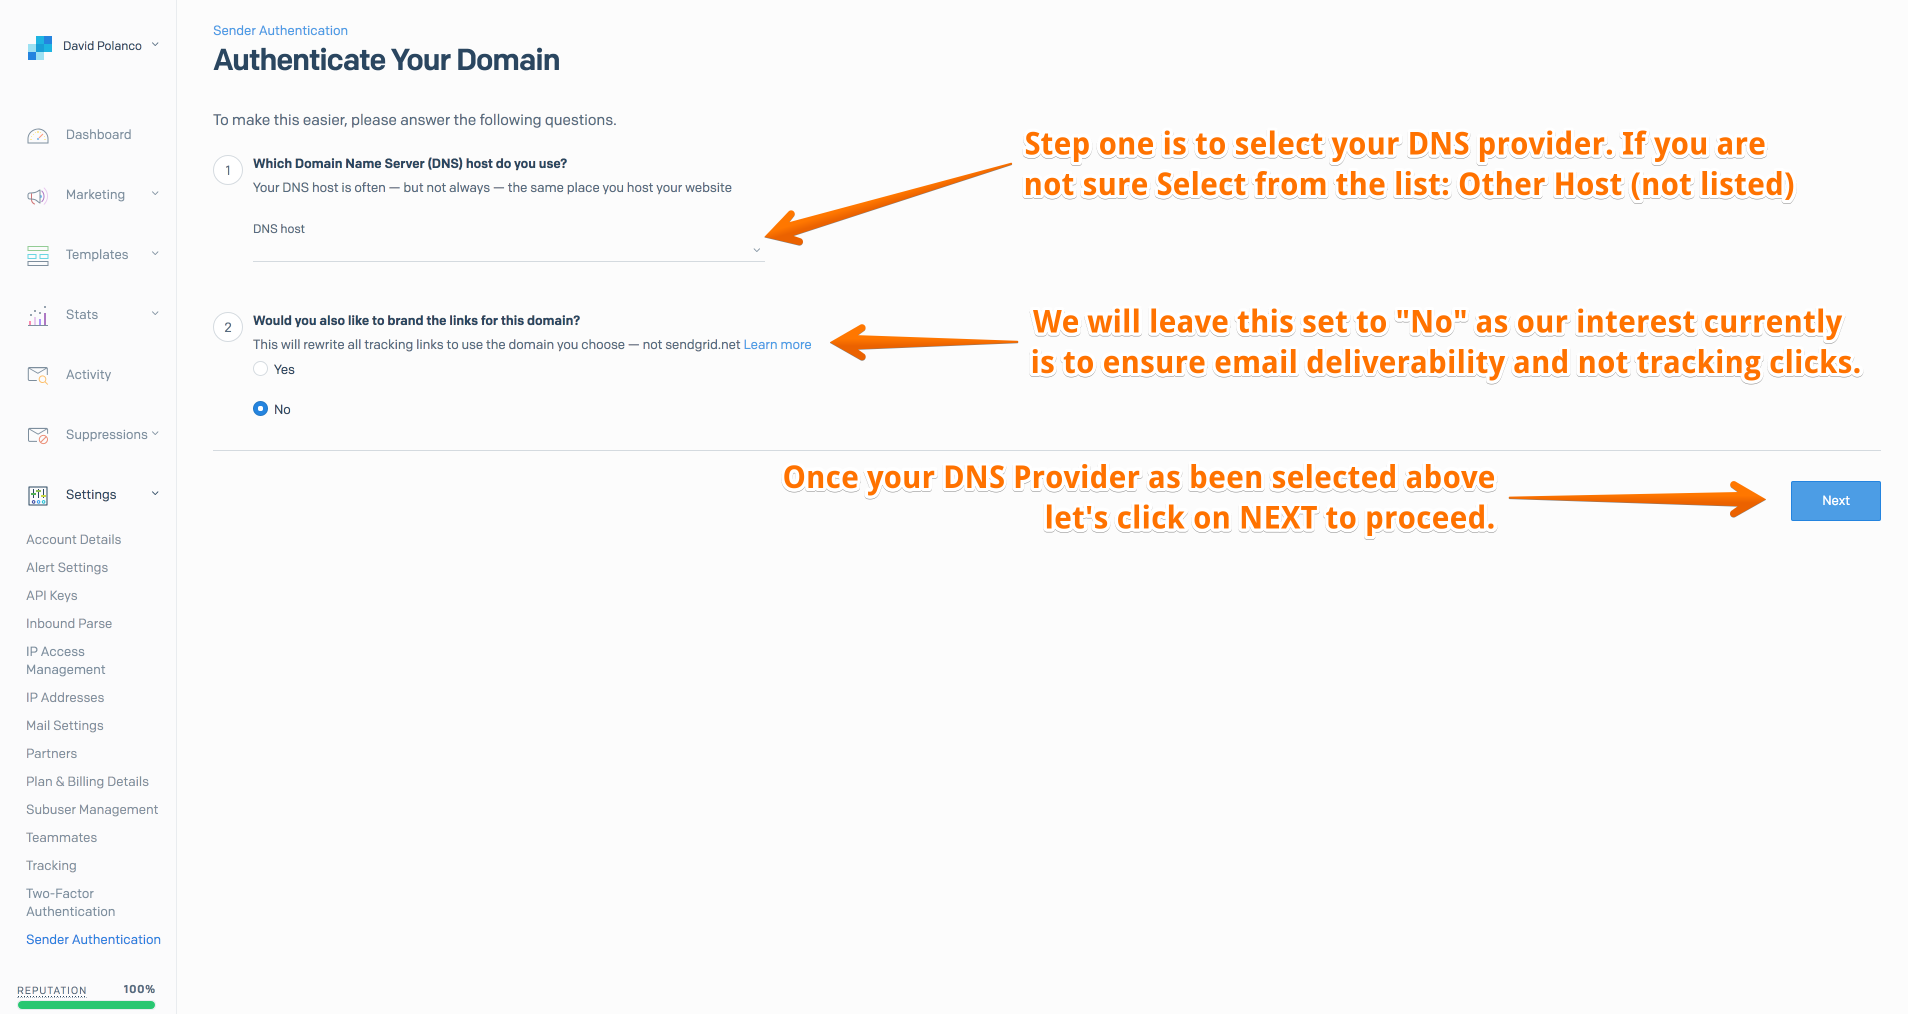
19. Now enter the domain that you wish to Send Email from. In my case it is davidpolanco.com Once this is done simply click on Next.

20. Now it’s up to use to configure DNS as illustrated below. We will need to do this at our respected DNS providers.

21. Below is a screenshot of my DNS configuration at CloudFlare your’s will certainly be different:
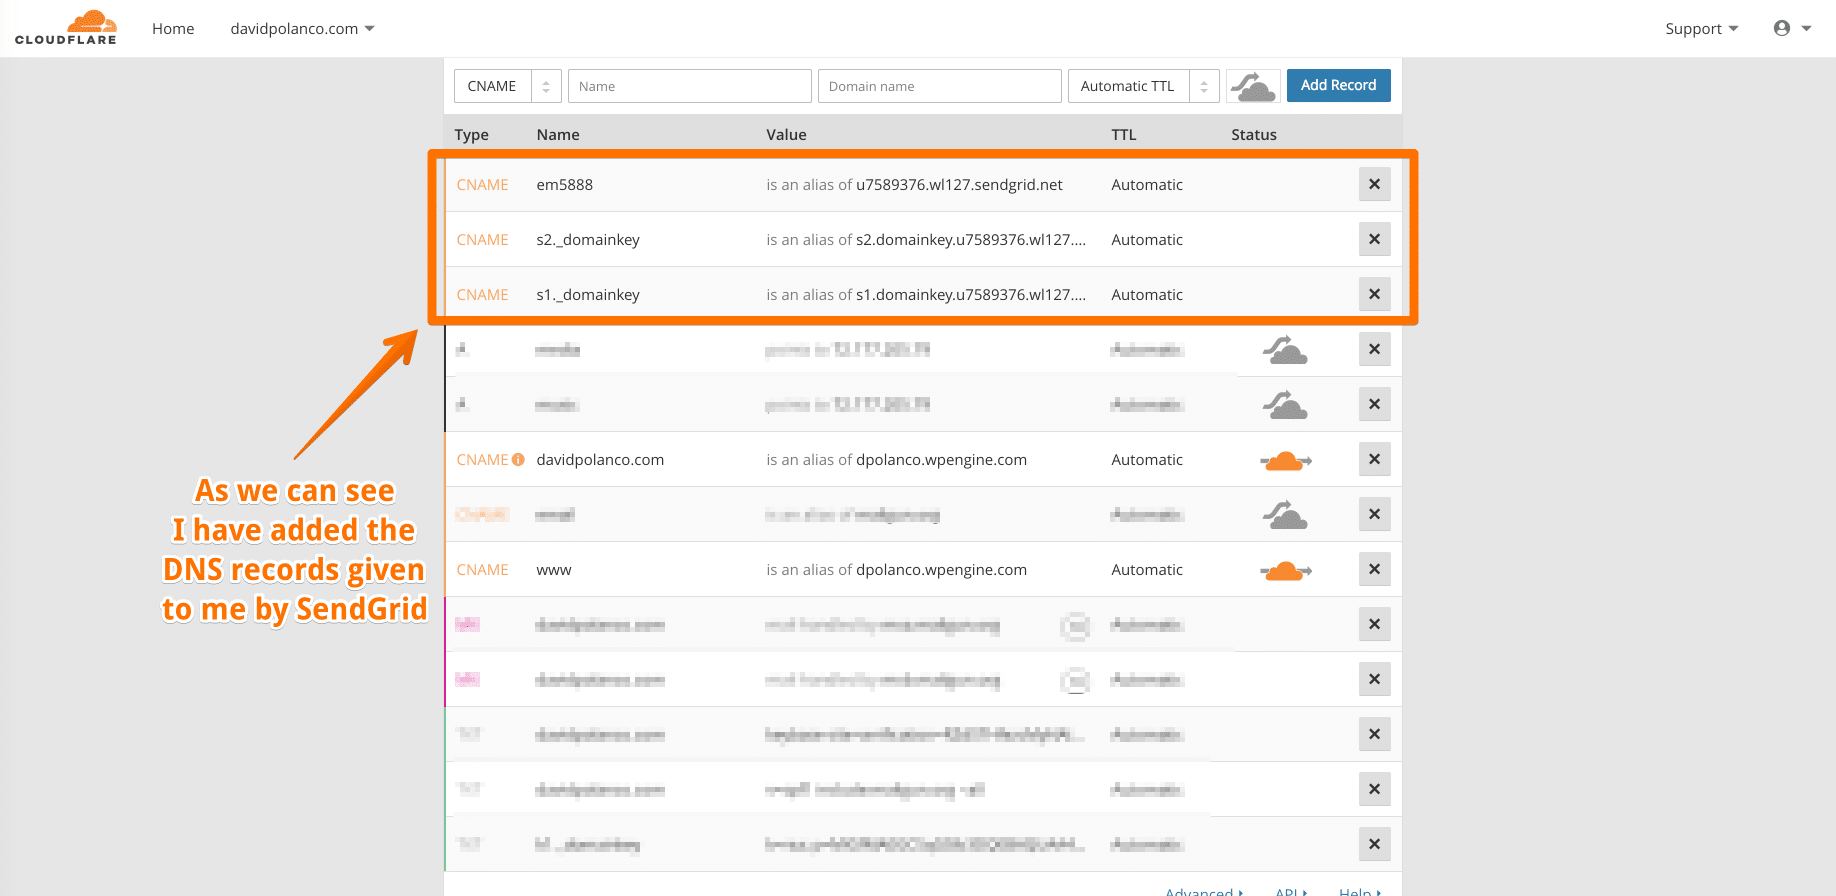
22. So once we have committed our DNS changes it can take time for this information to propagate throughout the internet. This propagation can take anywhere from 24 to 48 hours, however utilizing DNS (domain name providers) such as GoDaddy these changes are at times committed instantly. However no one provider is the same. So be patient. Once you feel that propagation has completed you can now click on VERIFY as shown in the screenshot below:

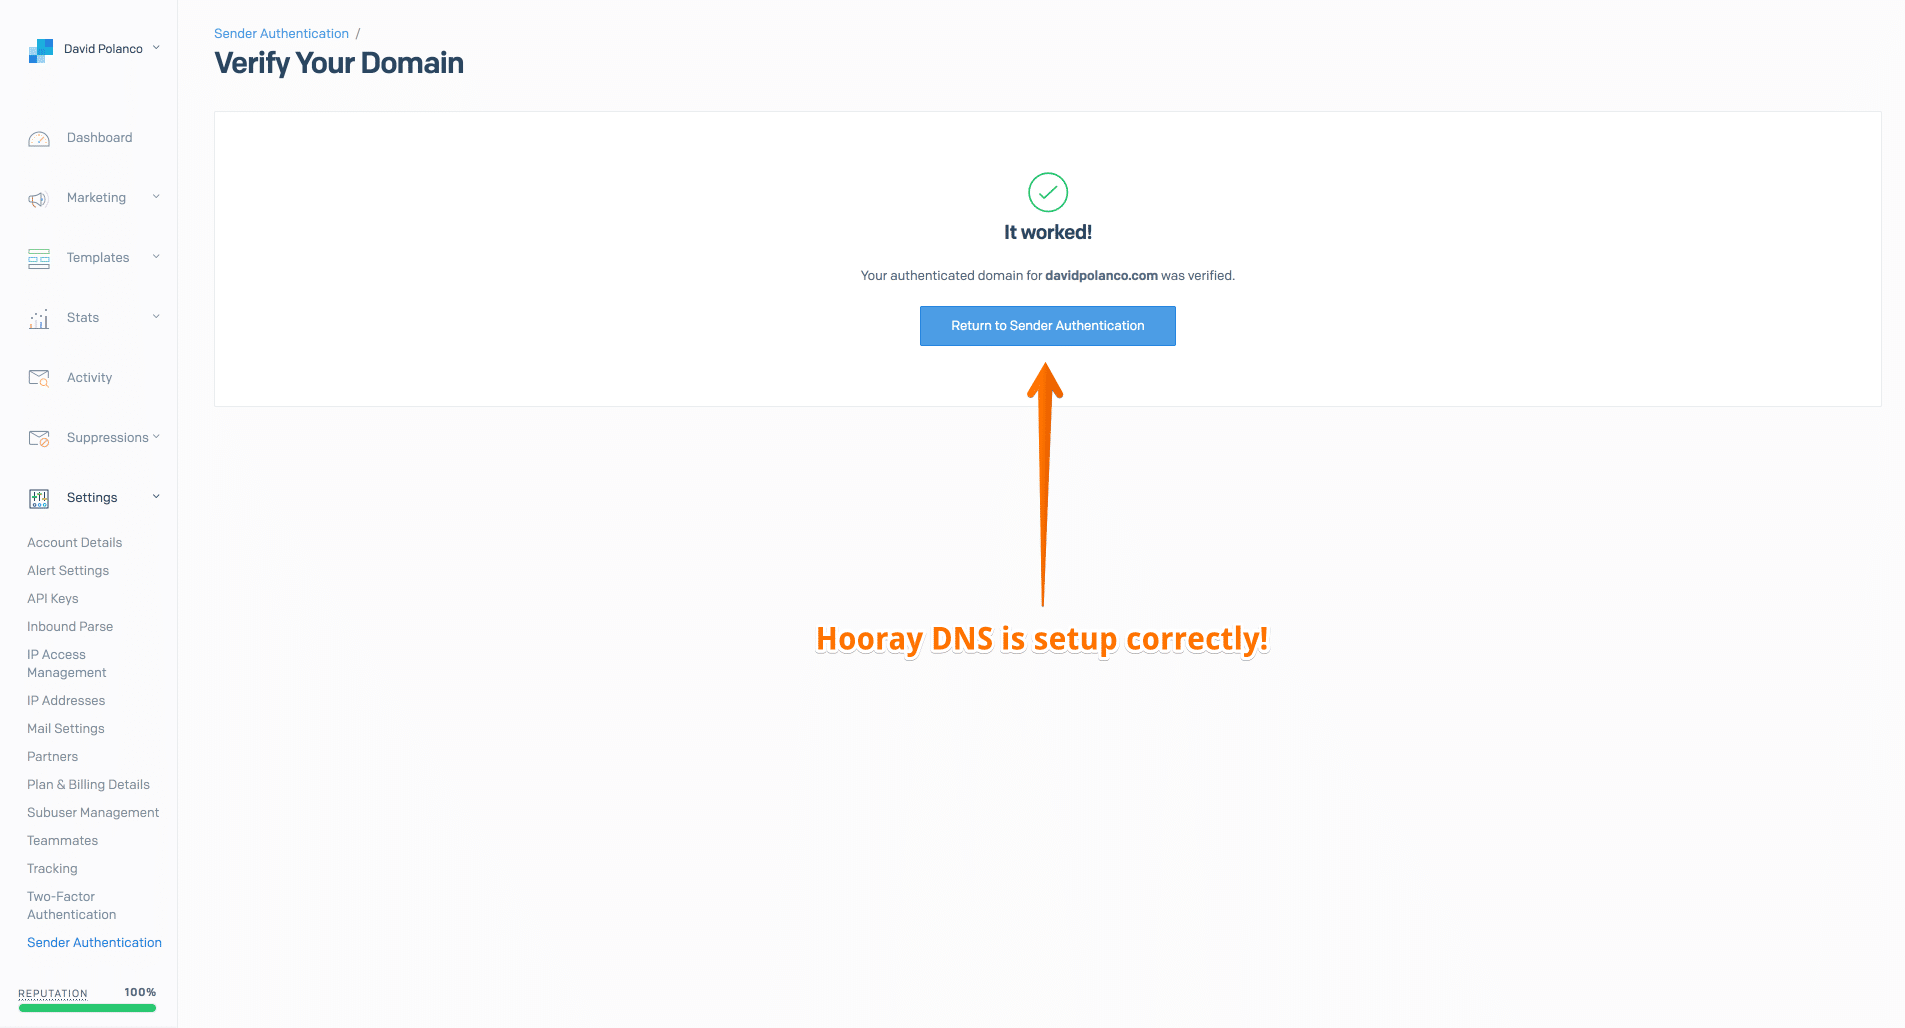
23. If everything went well you should be all set, and the screenshot below should illustrate “IT WORKED”, your authenticated domain for (yourdomain.com) was verified.
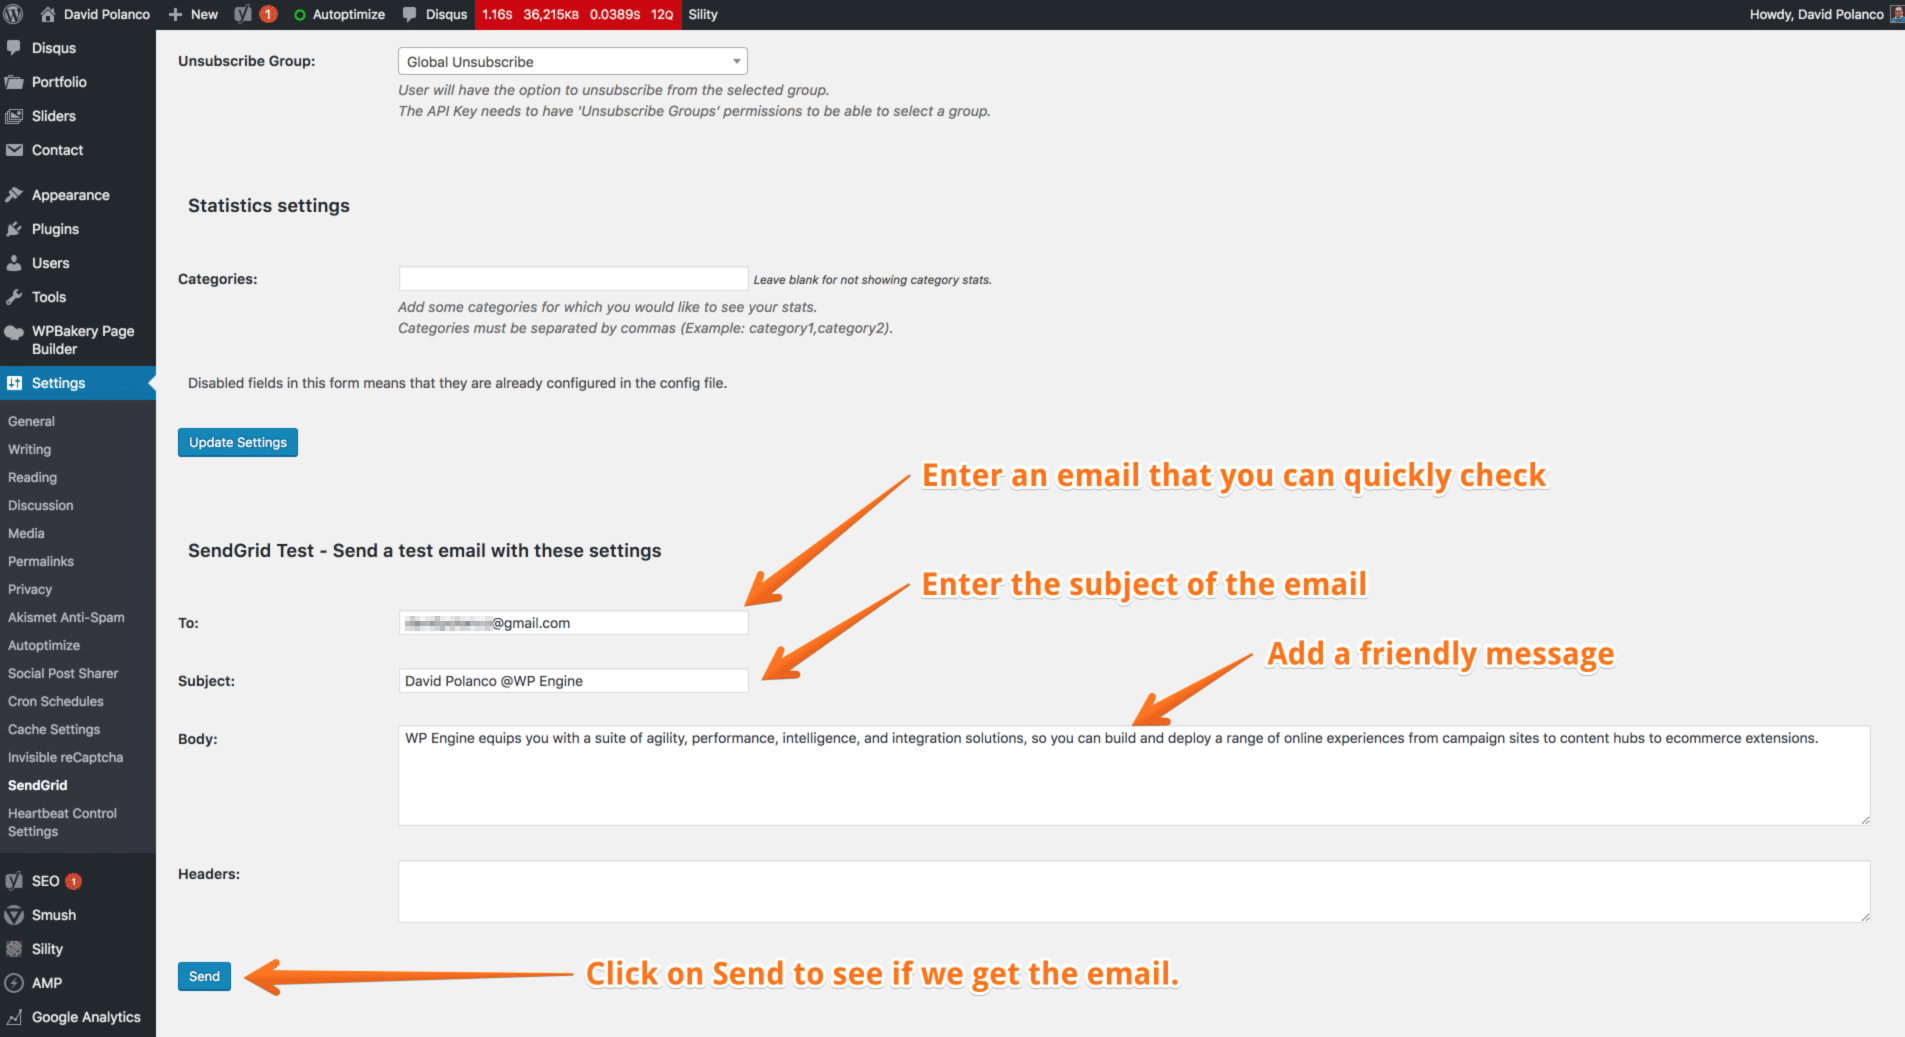
24. Now that our journey configuring DNS is completed all we need to do now is test the fruits of our labor! Let’s navigate back to our WP-Admin > Settings > SendGrid. At the bottom of the page you will see something like the screenshot below that will allow us to send a test email from our WordPress install to an email of our choosing. In my case I have entered my name and I will have this sent to a Gmail Account that I have along with a friendly message. Once this is complete simply hit send.
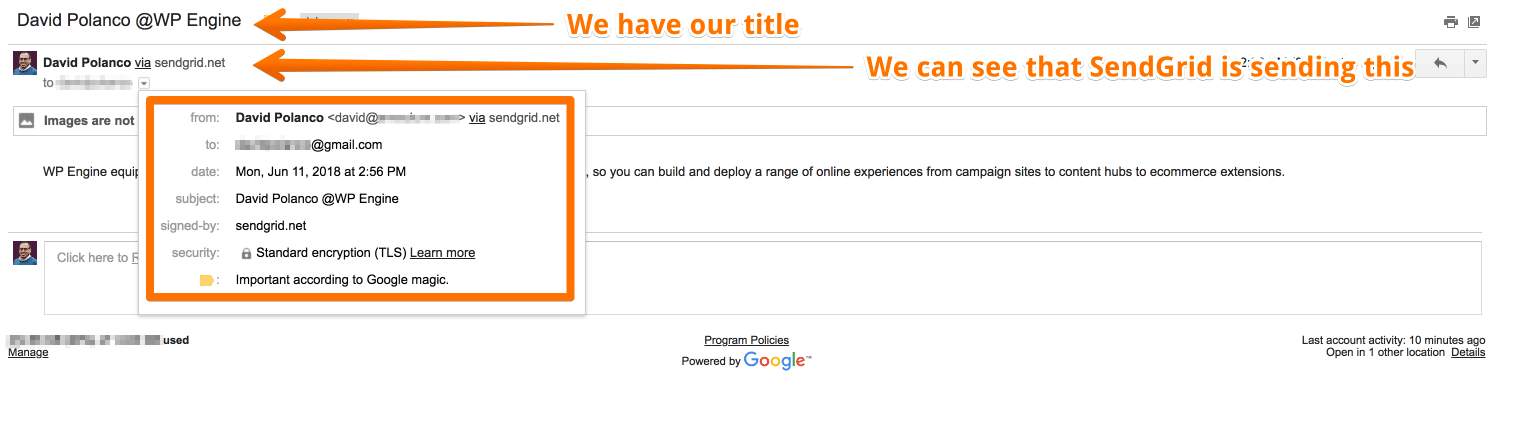
25. Once we hit send we should have gotten taken to the top of the SendGrid page with a message that says Email was Sent.

26. Now that our message is sent, it’s time to check our email. Below is a screenshot of the email being received directly into my Inbox.
Finalization:
Moving forward since now we can begin setting up contact forms on my site I use Contact Form 7 to manage my contact form as it is easy and does everything that I need it to do. (plus there is no configuration needed) Once the plugin is installed WordPress should immediately begin utilizing the SendGrid API and sending out your emails securely, and efficiently. If you have any questions do not hesitate to leave a comment below.
Thank you:
Many thanks to the WordPress Platform, WP Engine®, and SendGrid©.
1 Comment
Tim Bowen
Is there another plugin you recommend since the one referenced in this article is no longer supported?
2022-10-26 - 12:38 amLeave A Comment