
Welcome back everyone to this Amazon AWS s3 Series. I would like to remind you if you have not setup your Amazon S3 Bucket you can follow this entry that I created for you.
Prerequisites:
- You will need an Setup an Amazon s3 Bucket
- You will need either a Linux or Mac Machine
- You will need access and some knowledge on how to use the command line.
s3cmd Installation:
1.) First off we will need to install the Amazon s3cmd software via terminal. I will be providing you how to do this both on a Linux Machine and on a Mac. However I will show you the installation specifically on a Mac, BUT the walkthrough is pretty straight forward and can be ported to ANY Linux Machine for the most part.
2. Installation on a Mac:
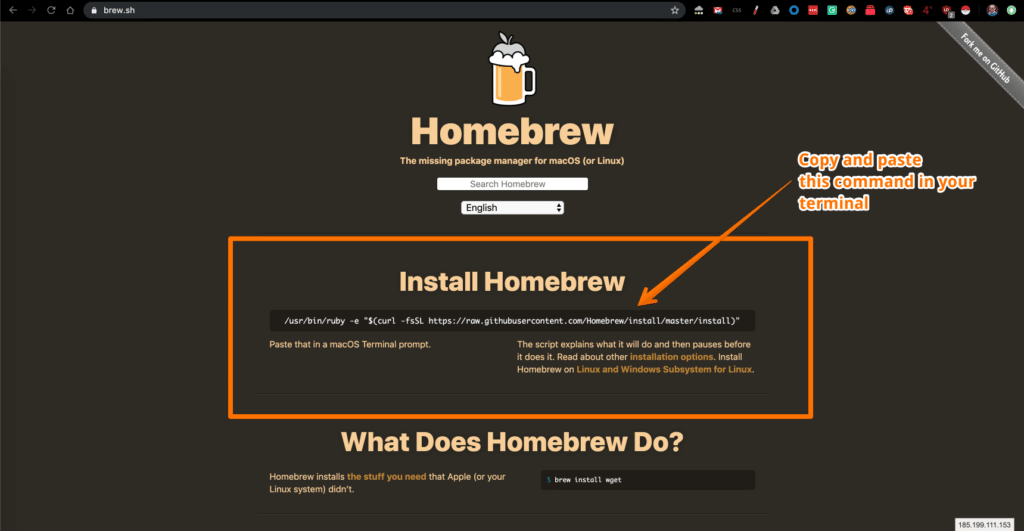
- Begin with opening your terminal and running the following command or visit the Homebrew website that will now provide you the Brew Package Manager for all the software that Apple doesn’t provide you.
/usr/bin/ruby -e "$(curl -fsSL https://raw.githubusercontent.com/Homebrew/install/master/install)"
3.) Now we need to install the s3cmd software on the Mac:
brew install s3cmd
3.) Installation on Linux (Debian, Ubuntu, or Raspberry Pi:
- Open your terminal and run the following command on your Linux Machine in your terminal:
sudo apt-get update && sudo apt-get install s3cmd
Installation on Linux CentOS or RedHat: Than you can run install s3cmd using the following command:
sudo yum update && yum --enablerepo epel-testing install s3cmd
4.) Once we have the software installed we now need to proceed with getting our software setup to read our Amazon s3 Bucket. As you can remember in our How to Setup and Amazon AWS S3 Bucket we setup a bucket so that we can begin placing files within it.
I named my bucket my-test-bucket-20
5.) Ok let’s get started! Now that we have our s3cmd software installed we need to now do some work in configuring it. It’s really not that bad in fact I would say it’s pretty easy as we are simply going to follow the prompts that I have outlined below for you:
s3cmd Configuration:
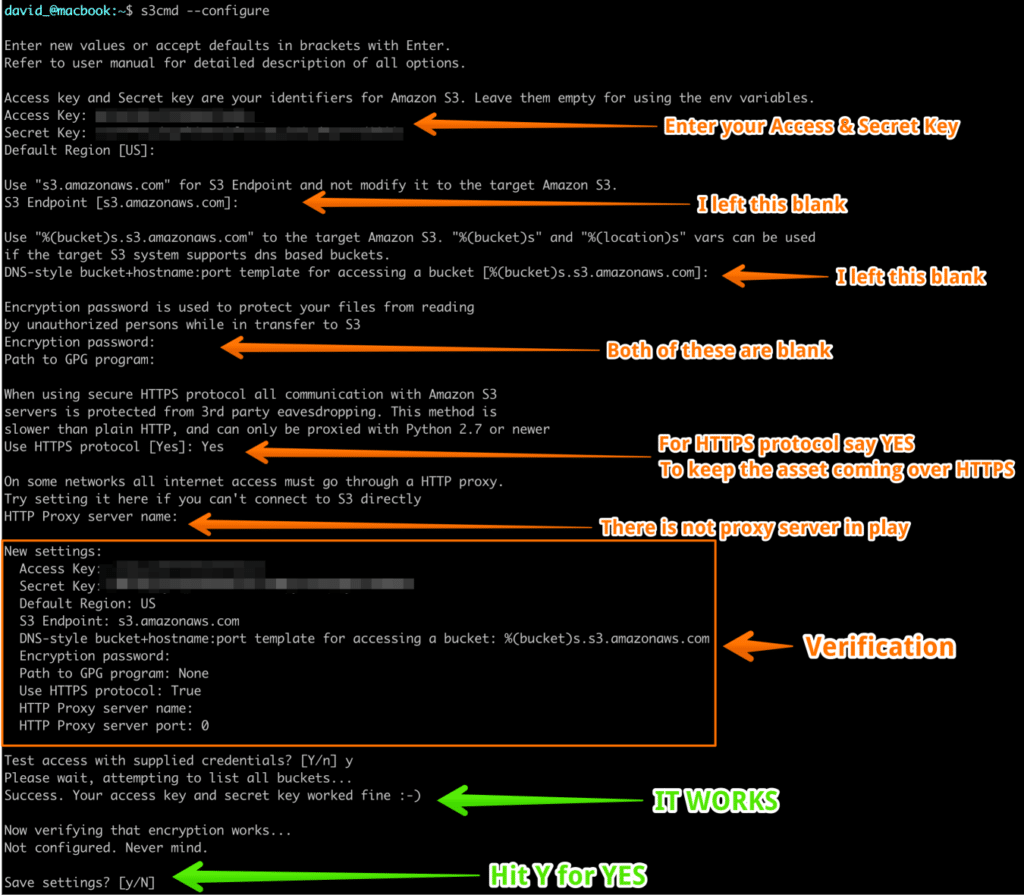
1.) Alright let’s get started! On your Mac or Linux Machine run the following command:
s3cmd --configure
2.) You will now be prompted to provide the following:
- Access Key
- Secret Key
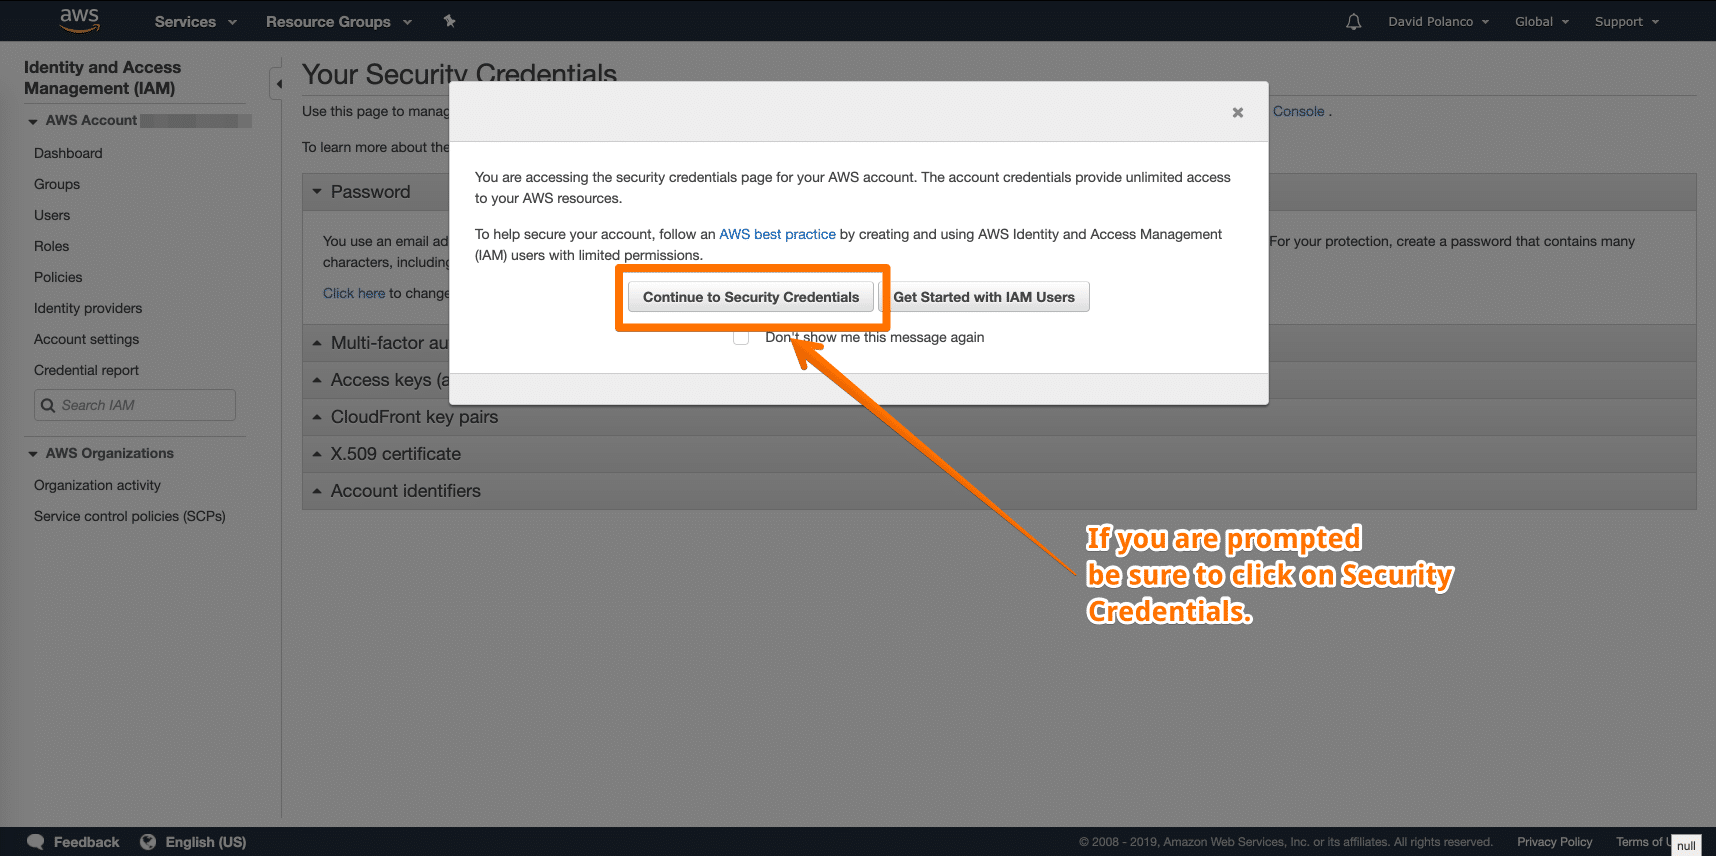
To obtain these keys you will need to login to you Amazon s3 Bucket and obtain your Access Key and Secret Key. You may be prompted with something like this. If you are simply click on Continue /w Security Credentials:
3.) Next let’s click on Access Keys (access key ID and secret access key):
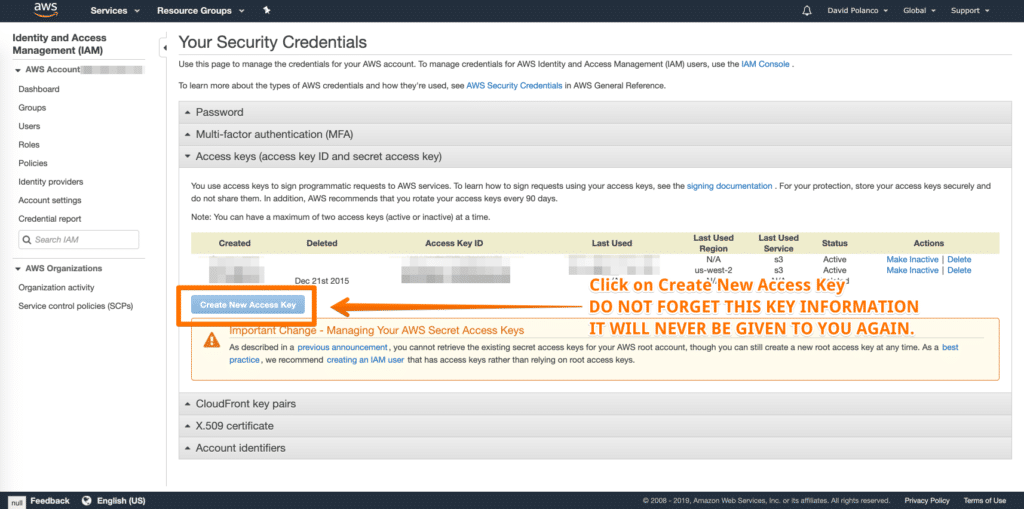
DO NOT FORGET THE ACCESS KEY & SECRET KEY. ONCE IT IS GONE IT IS GONE! SO MAKE A BACKUP of the FILE SOMEWHERE SAFE (IDEALLY somewhere that is NOT online).
4.) Now that we have enter our Access Key and Secret Key along with a other prompts:
5.) In terminal we have our s3cmd --configure
6.) Enter your Access Key and Secret Key:
Access key and Secret key are your identifiers for Amazon S3. Leave them empty for using the env variables.
Access Key: ENTER YOUR ACCESS KEY
Secret Key: ENTER YOUR SECRET KEY
7.) Now let’s specify our Region of the bucket that we created. Mine is US:
Default Region [US]:
8.) The s3 end point you can hit enter:
Use "s3.amazonaws.com" for S3 Endpoint and not modify it to the target Amazon S3.
S3 Endpoint [s3.amazonaws.com]:
9.) Bucket and location you can hit enter:
Use "%(bucket)s.s3.amazonaws.com" to the target Amazon S3. "%(bucket)s" and "%(location)s" vars can be used
if the target S3 system supports dns based buckets.
DNS-style bucket+hostname:port template for accessing a bucket [%(bucket)s.s3.amazonaws.com]:
10.) Encryption and passwords from reading the files just hit enter:
Encryption password is used to protect your files from reading
by unauthorized persons while in transfer to S3
Encryption password:
Path to GPG program:
11.) Use HTTPS protocol? YES!
When using secure HTTPS protocol all communication with Amazon S3
servers is protected from 3rd party eavesdropping. This method is
slower than plain HTTP, and can only be proxied with Python 2.7 or newer
Use HTTPS protocol [Yes]: Yes
12.) HTTP Proxy Server Name: (you can hit enter just leave it blank)
On some networks all internet access must go through a HTTP proxy.
Try setting it here if you can't connect to S3 directly
HTTP Proxy server name:
13.) VERIFICATION OF OUR SETTINGS: (below are mine)
New settings:
  Access Key: YOUR ACCESS KEY
  Secret Key: YOUR SECRET KEY
  Default Region: US
  S3 Endpoint: s3.amazonaws.com
  DNS-style bucket+hostname:port template for accessing a bucket: %(bucket)s.s3.amazonaws.com
  Encryption password:
  Path to GPG program: None
  Use HTTPS protocol: True
  HTTP Proxy server name:
  HTTP Proxy server port: 0
14.) Test access with supplied credentials? Y
Test access with supplied credentials? [Y/n] y
If all was done successfully you will be prompted with a message that says:
Please wait, attempting to list all buckets…
Success. Your access key and secret key worked fine 🙂Now verifying that encryption works…
Not configured. Never mind.Save settings? [y/N]
Hit Y for yes and we are all set!
Here is a screen shot of the s3cmd –configure command to guide you:
Here is a contextual breakdown of the screen above:
david_@macbook:~$ s3cmd –configure
Enter new values or accept defaults in brackets with Enter.
Refer to user manual for detailed description of all options.Access key and Secret key are your identifiers for Amazon S3. Leave them empty for using the env variables.
Access Key:
Secret Key:
Default Region [US]:Use “s3.amazonaws.com” for S3 Endpoint and not modify it to the target Amazon S3.
S3 Endpoint [s3.amazonaws.com]:Use “%(bucket)s.s3.amazonaws.com” to the target Amazon S3. “%(bucket)s” and “%(location)s” vars can be used
if the target S3 system supports dns based buckets.
DNS-style bucket+hostname:port template for accessing a bucket [%(bucket)s.s3.amazonaws.com]:Encryption password is used to protect your files from reading
by unauthorized persons while in transfer to S3
Encryption password:
Path to GPG program:When using secure HTTPS protocol all communication with Amazon S3
servers is protected from 3rd party eavesdropping. This method is
slower than plain HTTP, and can only be proxied with Python 2.7 or newer
Use HTTPS protocol [Yes]: YesOn some networks all internet access must go through a HTTP proxy.
Try setting it here if you can’t connect to S3 directly
HTTP Proxy server name:New settings:
Access Key:
Secret Key:
Default Region: US
S3 Endpoint: s3.amazonaws.com
DNS-style bucket+hostname:port template for accessing a bucket: %(bucket)s.s3.amazonaws.com
Encryption password:
Path to GPG program: None
Use HTTPS protocol: True
HTTP Proxy server name:
HTTP Proxy server port: 0Test access with supplied credentials? [Y/n] y
Please wait, attempting to list all buckets…
Success. Your access key and secret key worked fine 🙂Now verifying that encryption works…
Not configured. Never mind.Save settings? [y/N]
Conclusion:
Well we are now certainly on our way! We now have our Amazon S3 Bucket configured in our article and now we can begin doing the necessary push of files from our laptops / desktops / web servers to our Amazon s3 bucket. In my next entry I will walk you through the Amazon s3 Push Command that will allow you to Push assets to the respected bucket.
Leave A Comment